Инструкции по работе с платформой
Здесь собраны пошаговые инструкции по всем возможностям платформы: от подачи заявки на соревнование до управления федерацией. Разделы помечены ролью, для которой они написаны, — используйте фильтр, чтобы оставить только нужное.
Роль:
Начало работы: вход и личный кабинет
СпортсменКапитан командыОрганизаторАдминистратор федерацииРегистрация, вход на сайт и то, что появляется в интерфейсе после авторизации.
- 1
Нажмите «Войти» в правом верхнем углу. Если аккаунта ещё нет, перейдите к регистрации со страницы входа.
- 2
После входа в правом верхнем углу появляются колокольчик уведомлений и ваше имя с аватаром.
- 3
В меню под аватаром доступны «Моя команда» (если вы состоите в команде) и выход из аккаунта.
- 4
Если у вас есть права управления, в левом меню внизу появится пункт «Управление».
Важно: Кнопки создания и редактирования появляются только у пользователей с соответствующими правами. Если нужной кнопки нет — обратитесь к администратору вашей федерации.
Роли и права доступа
ОрганизаторАдминистратор федерацииПрава выдаются отдельно на уровне федерации и отдельно на конкретное соревнование.
- 1
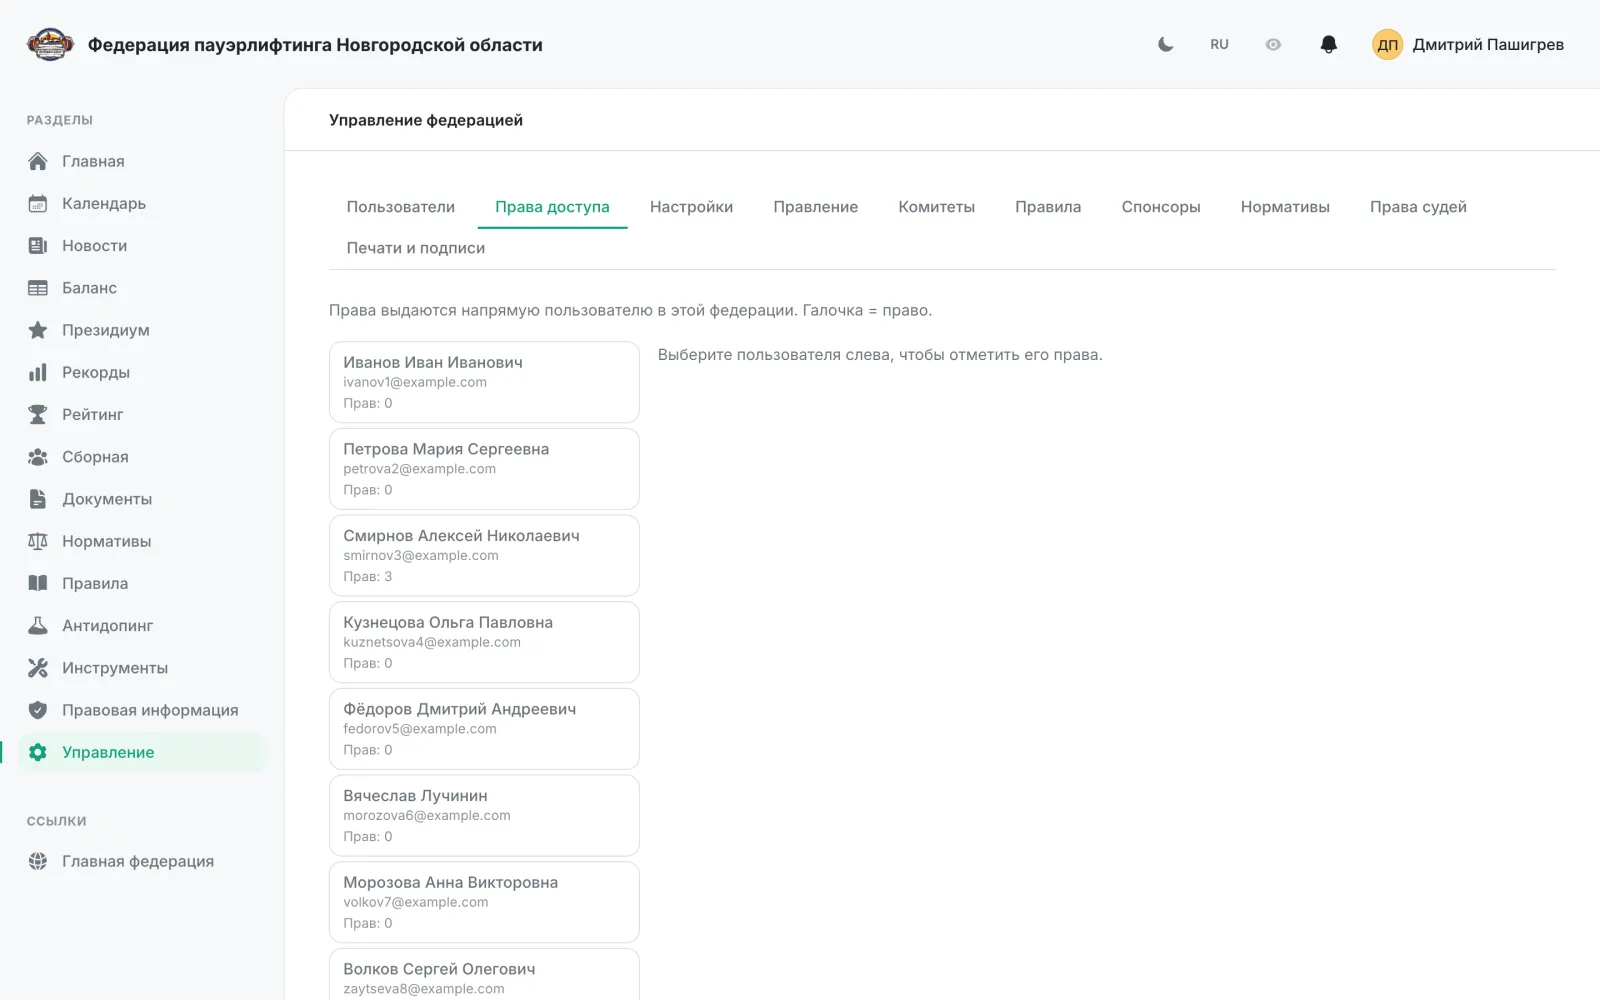
Права федерации выдаются в разделе «Управление» → вкладка «Права доступа»: там же видно, сколько прав выдано каждому пользователю.
- 2
Права на конкретное событие — редактирование, расписание, судейство и заявки — проверяются отдельно и определяют, какие кнопки видны на странице соревнования.
- 3
Судье можно выдать ограниченный набор прав на событие: работу с заявками и расписанием.
Важно: Сайт региональной федерации управляет только своими событиями — соревнования других регионов открываются лишь для просмотра.
Создание соревнования
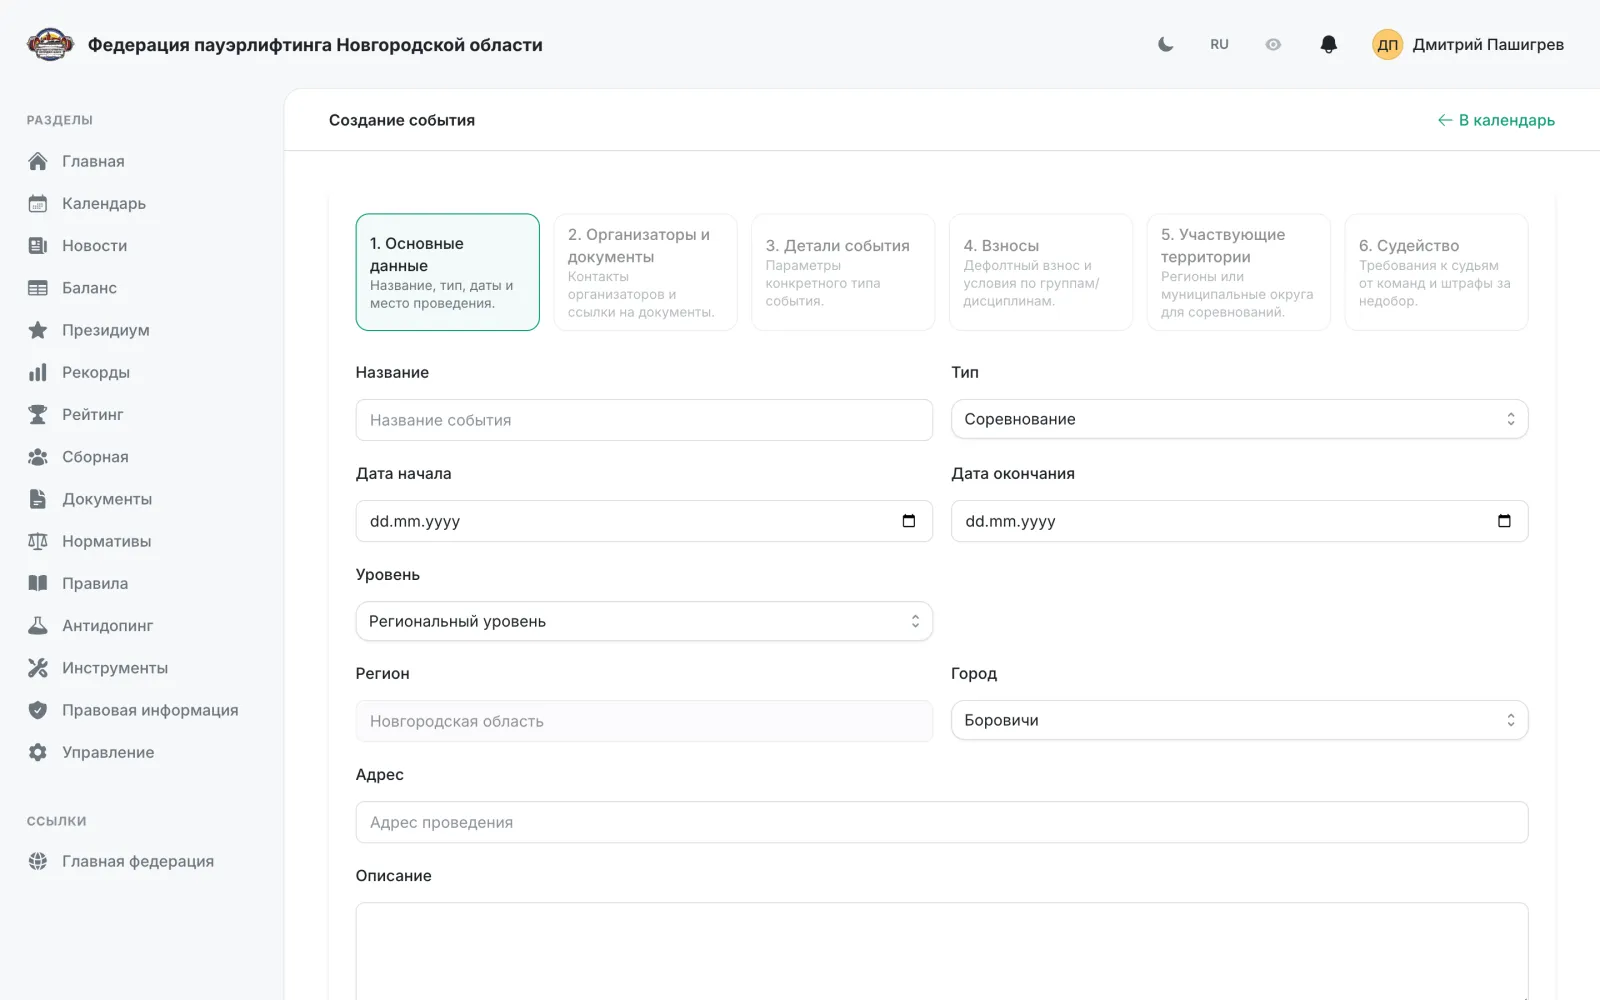
ОрганизаторМастер из шести шагов: от названия и дат до требований к судейству от команд.
- 1
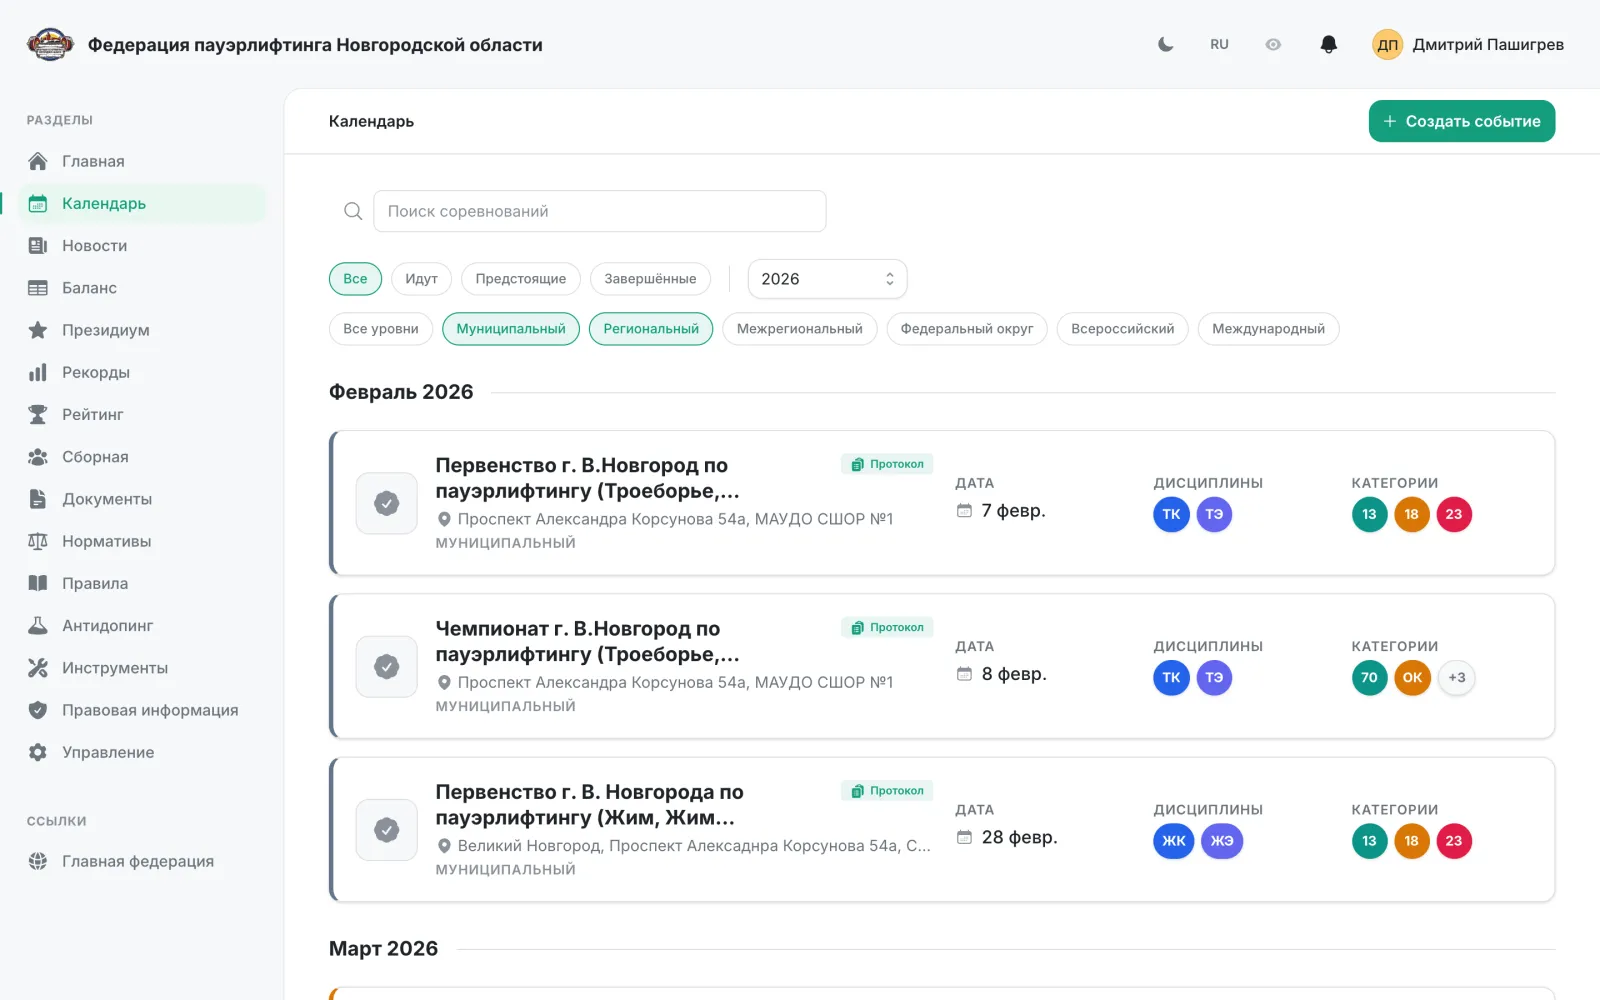
Откройте «Календарь» и нажмите «Создать событие».
- 2
Шаг 1 «Основные данные»: название, тип события, даты начала и окончания, уровень, регион, город, адрес и описание.
- 3
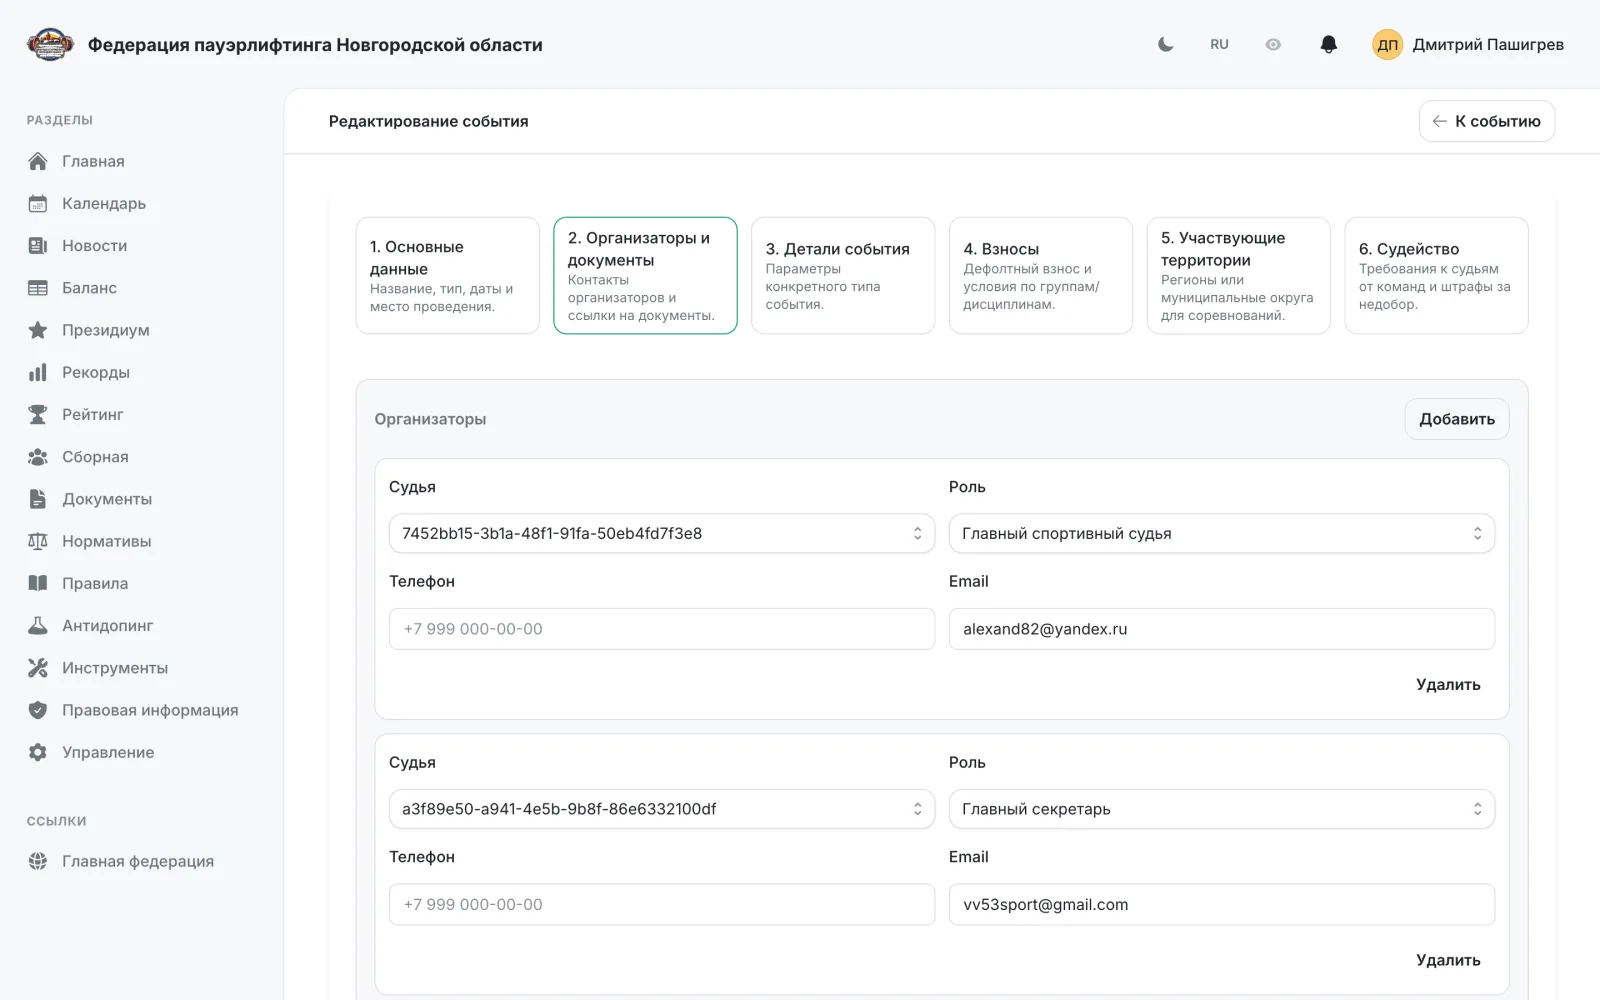
Шаг 2 «Организаторы и документы»: главный спортивный судья и главный секретарь, телефон и email для связи, а также положение, расписание, афиша и итоговый протокол.
- 4
Шаг 3 «Детали события»: тип календарного плана (ЕКП или КП — зависит от уровня старта), признак открытого соревнования, сроки приёма заявок, возрастные группы, весовые категории и дисциплины.
- 5
Шаг 4 «Взносы»: взнос по умолчанию и упорядоченный список правил. Правило — это условия (возраст от/до включительно, возрастная группа, дисциплина) и сумма, где 0 — бесплатно; применяется первое подходящее правило сверху вниз, а правило без условий действует «для всех остальных». Порядок правил меняется стрелками.
- 6
Шаг 5 «Участвующие территории»: регионы или муниципальные округа, спортсмены которых допускаются к соревнованию.
- 7
Шаг 6 «Судейство»: требовать ли судей от команд, сколько спортсменов приходится на одно судейство, минимальная категория судьи и штраф за недобор.
- 8
Нажмите «Сохранить». Между шагами можно свободно переключаться кнопками «Назад» и «Далее» или щелчком по нужному шагу.
Важно: Все шесть шагов доступны только для типа «Соревнование». Для остальных типов событий заполняются первые три шага.
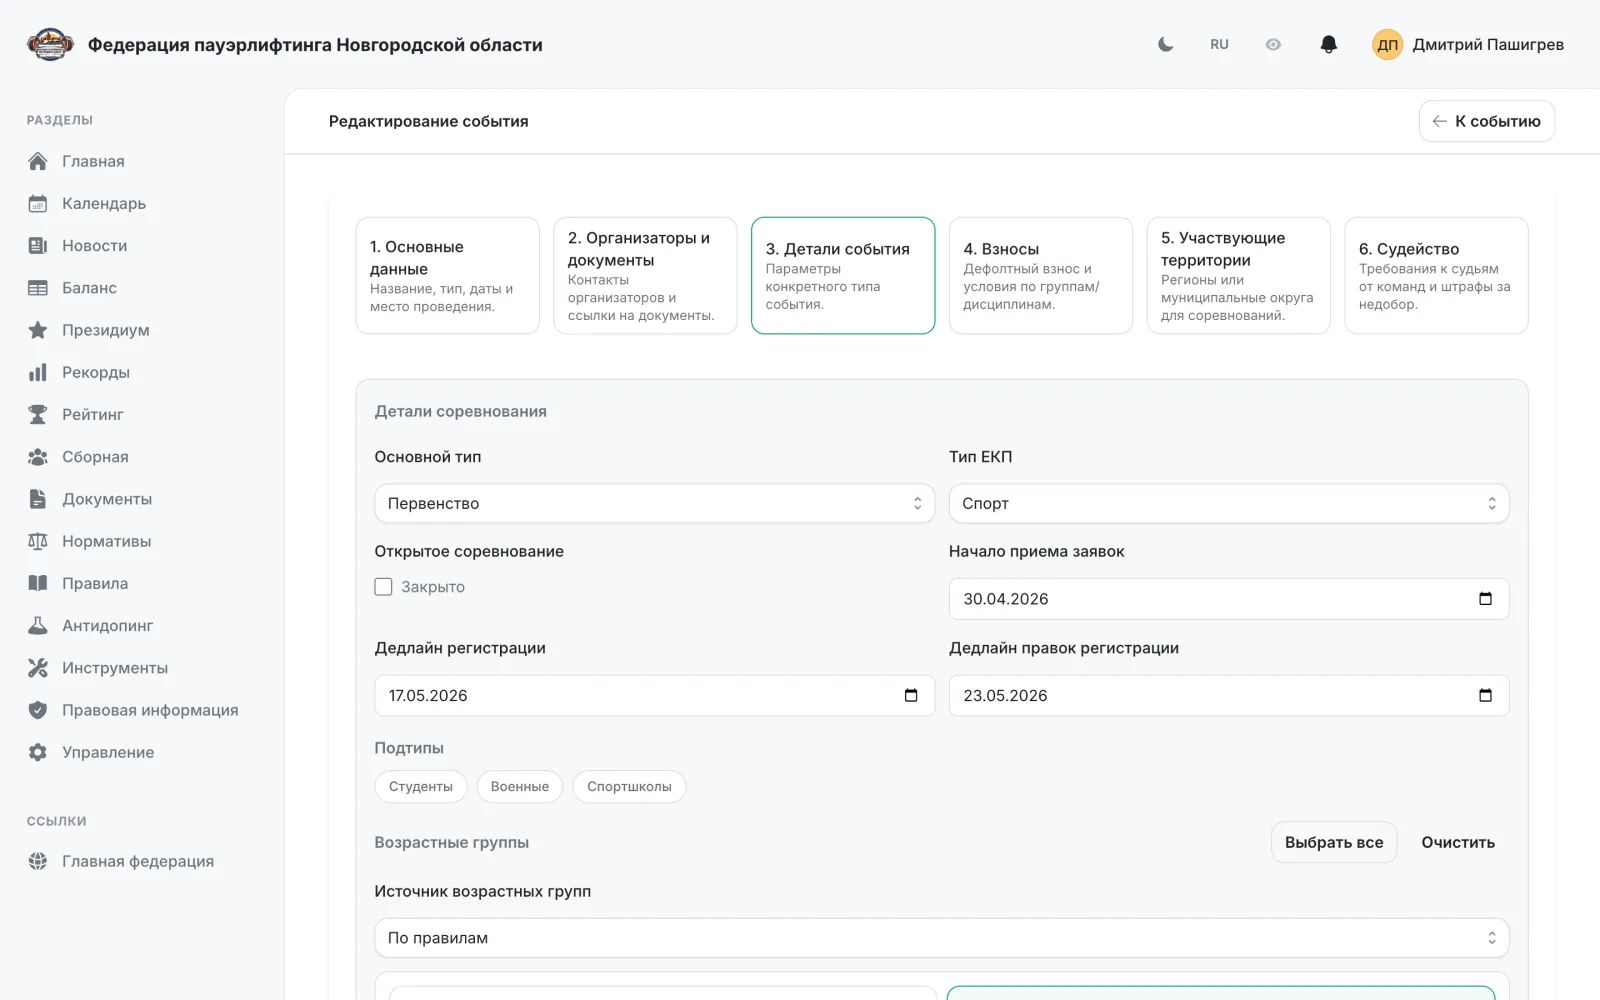
Редактирование соревнования
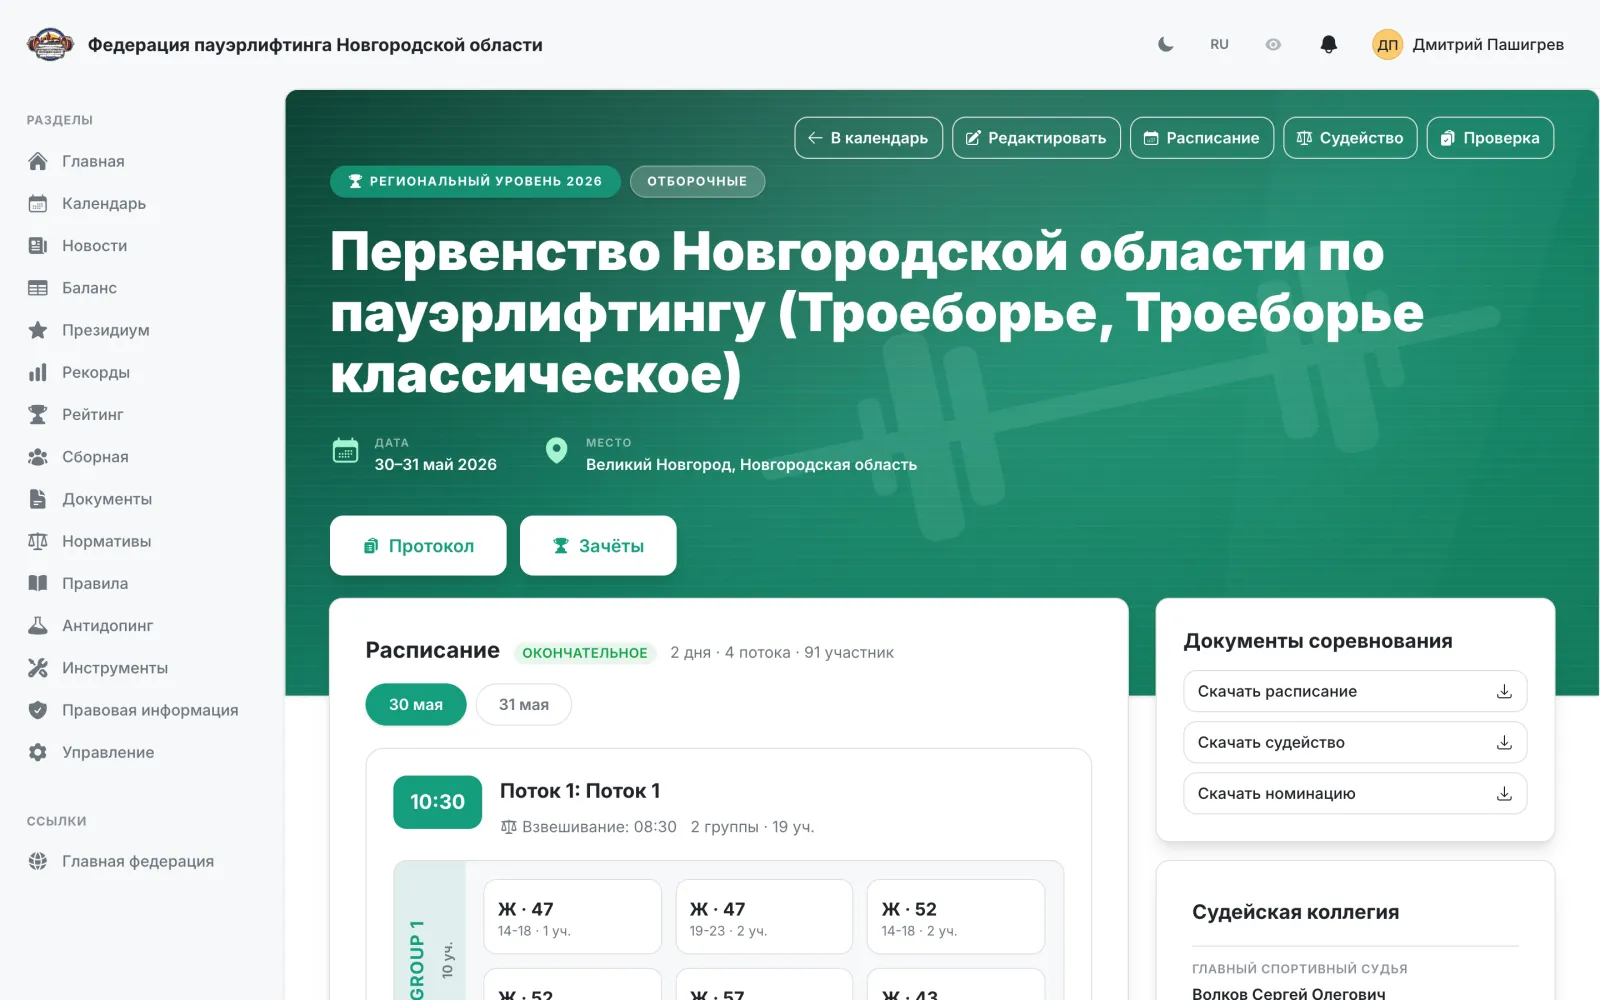
ОрганизаторТот же мастер, что и при создании: шаги те же, но открыты все сразу и сохранить можно с любого.
- 1
Откройте страницу соревнования и нажмите «Редактировать».
- 2
Шаги те же, что в мастере создания, и открыты все сразу: переходите к нужному щелчком по ленте на помосте, не проходя мастер целиком.
- 3
Что ведётся на платформе, переключается над лентой шагов: «только заявки судей» убирает состав, взносы и допуск, «только заявки спортсменов» — судейство от команд. Выключенные настройки остаются в форме, но на сервер не уезжают.
- 4
Только в редактировании есть последний шаг «Страхование»: включите его, чтобы в заявке появился шаг оформления полисов. Если у федерации не заданы условия страхования, включить его нельзя.
- 5
«Сохранить» доступно на любом шаге и сохраняет данные всех шагов сразу; «К событию» возвращает без сохранения.
Важно: Сайт региональной федерации может редактировать только события своего региона.
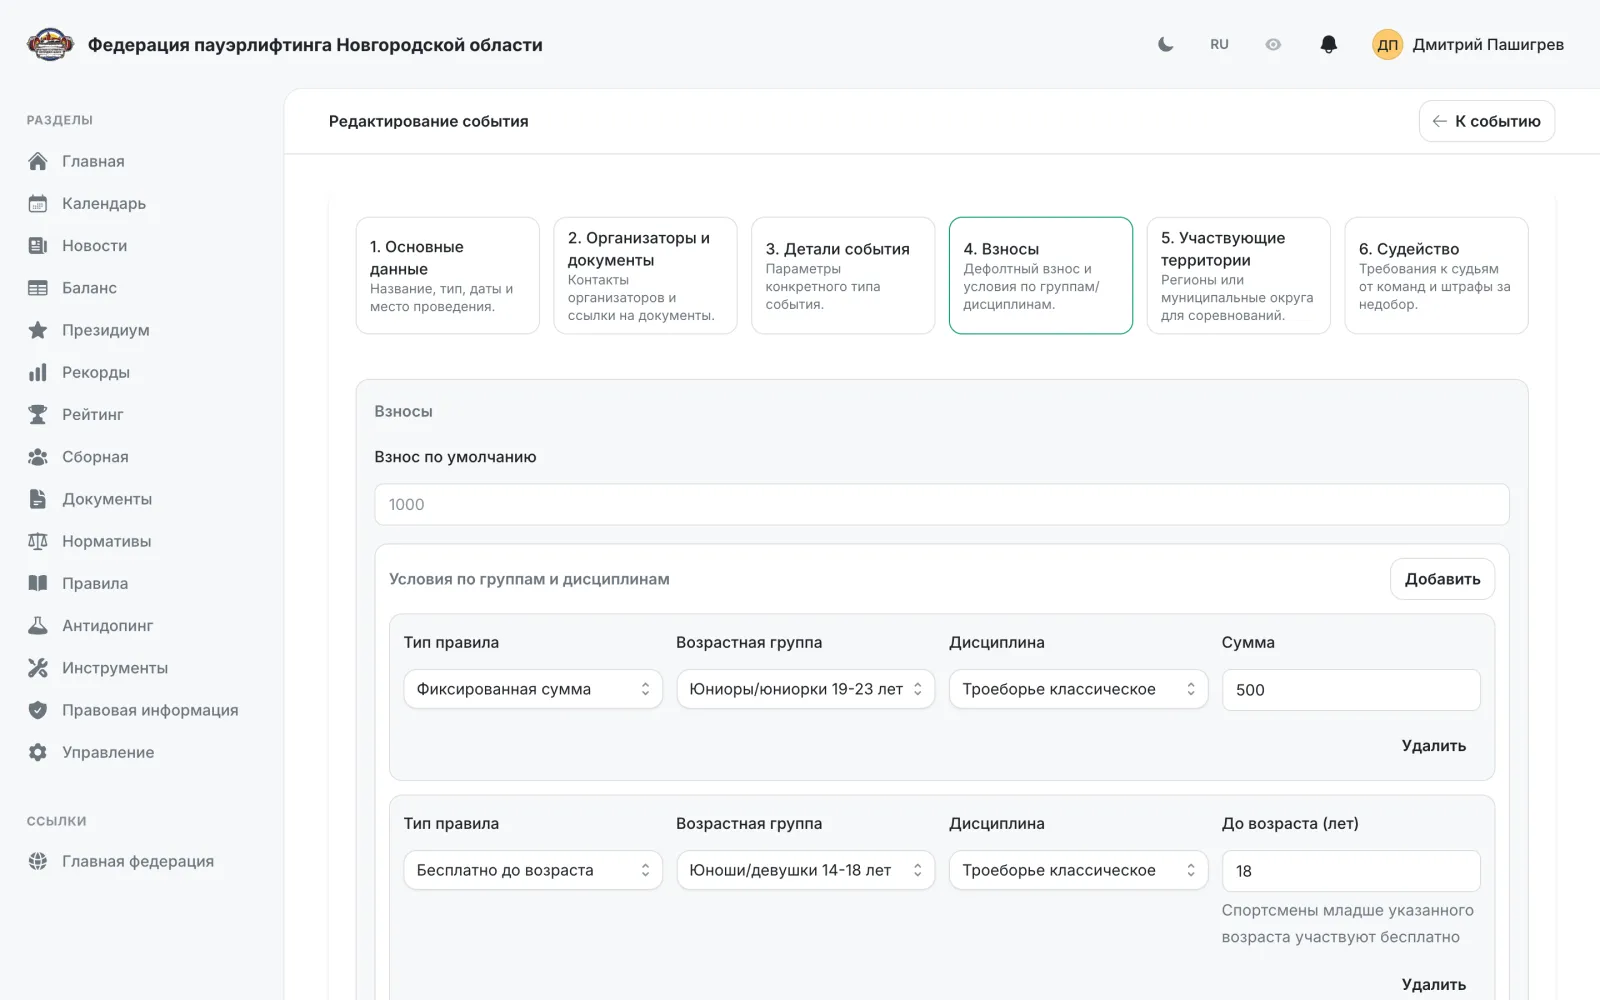
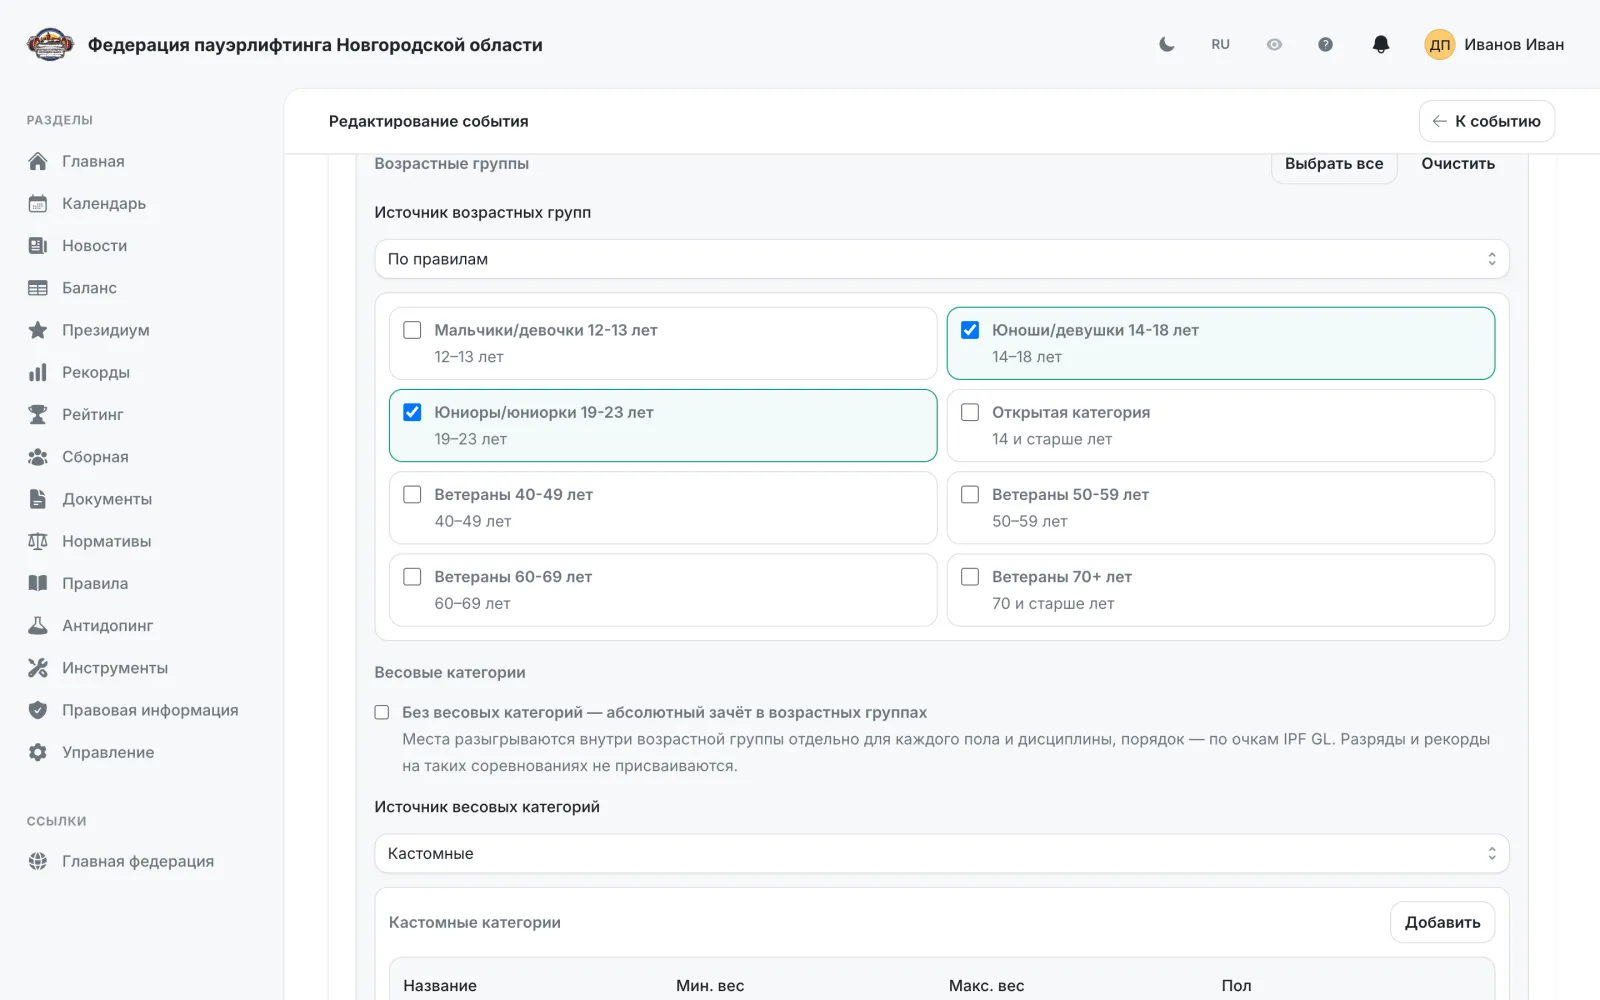
Возрастные группы и весовые категории соревнования
ОрганизаторШаг 3 мастера события: какие группы и категории разыгрываются на конкретном соревновании — из правил или свои.
- 1
Откройте соревнование, нажмите «Редактировать» и перейдите на шаг 3 «Детали события». Блоки «Возрастные группы», «Весовые категории» и «Дисциплины» есть только у событий типа «Соревнование».
- 2
По умолчанию источник — «По правилам»: отметьте галочками нужные группы и категории из справочника. Кнопки «Выбрать все» и «Очистить» — справа от заголовка блока.
- 3
Весовые категории фильтруются по выбранным возрастным группам: юношеские категории появляются в списке только после того, как отмечена соответствующая возрастная группа.
- 4
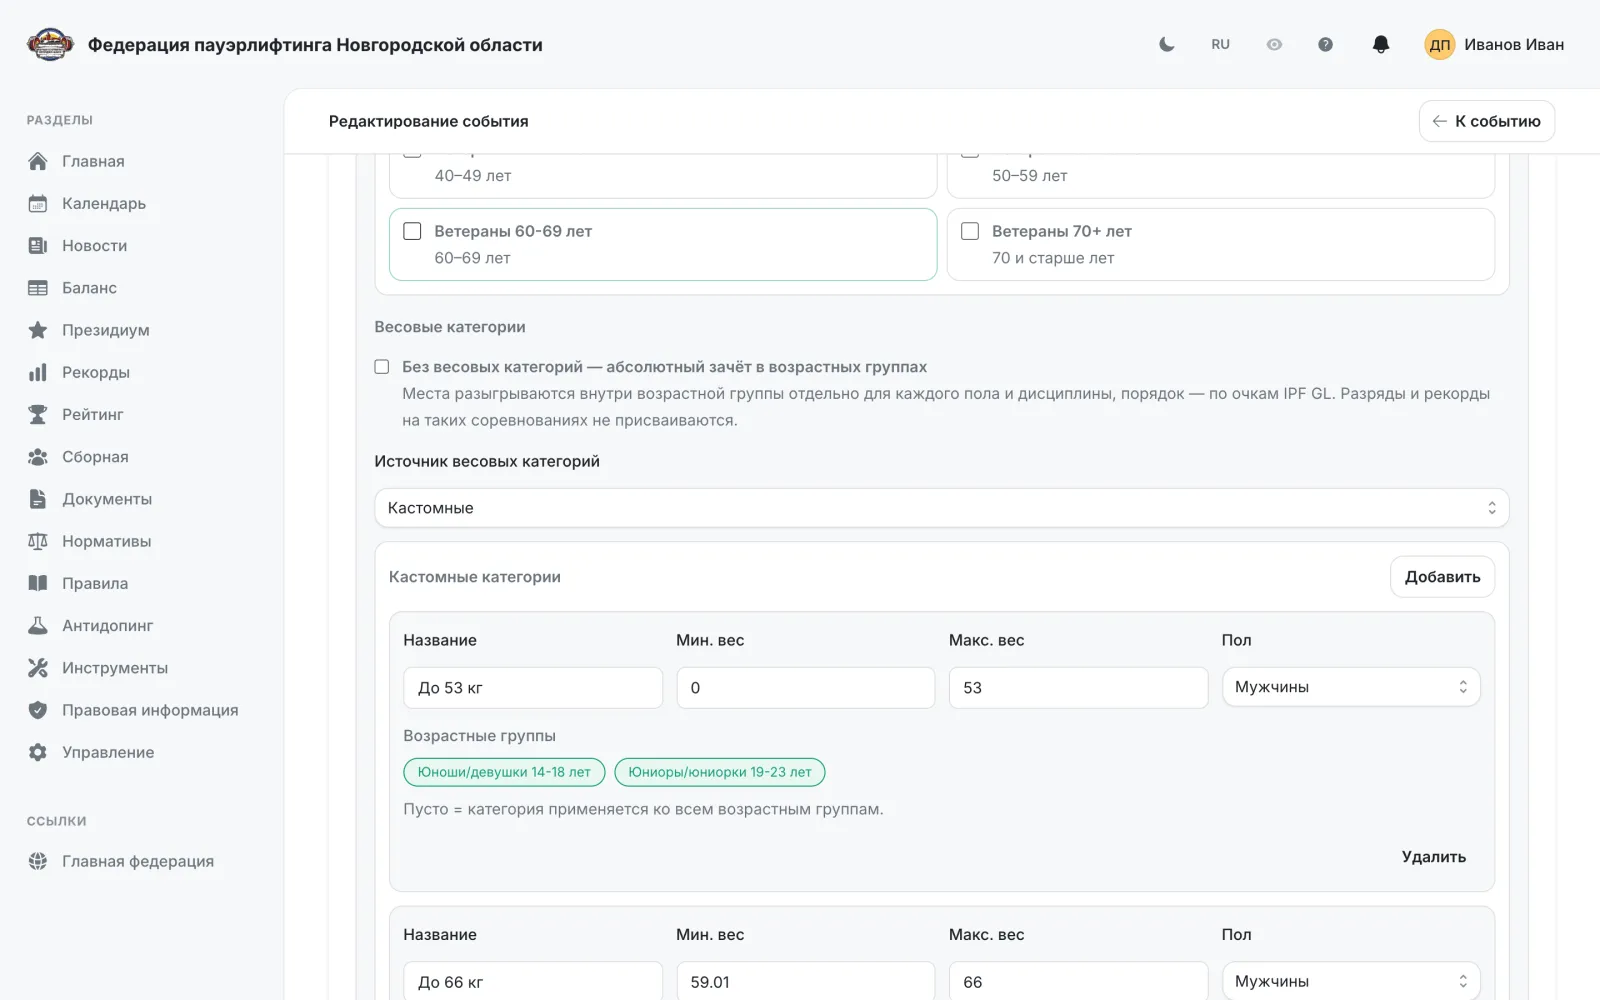
Чтобы задать свои группы, переключите «Источник возрастных групп» на «Свои» и нажмите «Добавить». В строке заполните «Название», «Мин. возраст» и «Макс. возраст».
- 5
Для своих весовых категорий переключите «Источник весовых категорий» на «Свои» и добавьте строки: «Название», «Мин. вес», «Макс. вес» и «Пол» — мужчины, женщины или смешанная.
- 6
«Макс. вес» обязателен, поэтому категорию «свыше 120 кг» задавайте явной верхней границей — например, от 120,01 до 999.
- 7
Под каждой добавленной весовой категорией отметьте возрастные группы, к которым она применяется. Если не отмечено ничего, категория действует во всех группах соревнования.
- 8
Если весовые категории не разыгрываются, включите «Без весовых категорий — абсолютный зачёт в возрастных группах»: места считаются внутри возрастной группы отдельно по полу и дисциплине, по очкам IPF GL.
- 9
Нажмите «Сохранить» — сохраняются данные всех шагов сразу. Ошибки по категориям показываются под соответствующим блоком.
Важно: Как только в списке появляется хотя бы одна своя категория, весь список события целиком переходит на свои категории: ранее отмеченные категории из правил превращаются в редактируемые строки. Свои категории не сопоставляются со справочником — разряды и рекорды по ним не присваиваются, а в протоколах и итоговых таблицах они выводятся кодом вида «custom-15-16». Задавайте состав категорий до открытия приёма заявок: на них ссылаются заявки, расписание и протоколы.
Подача индивидуальной заявки
СпортсменЗаявка спортсмена, который не состоит в команде.
- 1
Откройте страницу соревнования в календаре и перейдите к подаче заявки.
- 2
Шаг 1 «Выбор дисциплин»: выберите дисциплины, возрастную группу и весовую категорию.
- 3
Шаг 2 «Проверка и подтверждение»: проверьте заявку в режиме предпросмотра.
- 4
Если организатор включил страхование, дальше идёт шаг «Страхование»: полис можно оформить прямо в заявке — см. раздел «Страхование в заявке».
- 5
Шаг «Сумма взносов»: платформа посчитает итоговую сумму к оплате за участие.
- 6
Подтвердите отправку — заявка уйдёт организатору на проверку.
Важно: Если вы состоите в команде, индивидуальная подача недоступна: заявку за вас подаёт капитан. Подача открыта только в срок приёма заявок, заданный организатором.
Подача заявки от команды
Капитан командыКапитан подаёт одну заявку сразу на всех спортсменов команды.
- 1
Откройте соревнование и перейдите к подаче заявки — капитан автоматически попадает в командную форму.
- 2
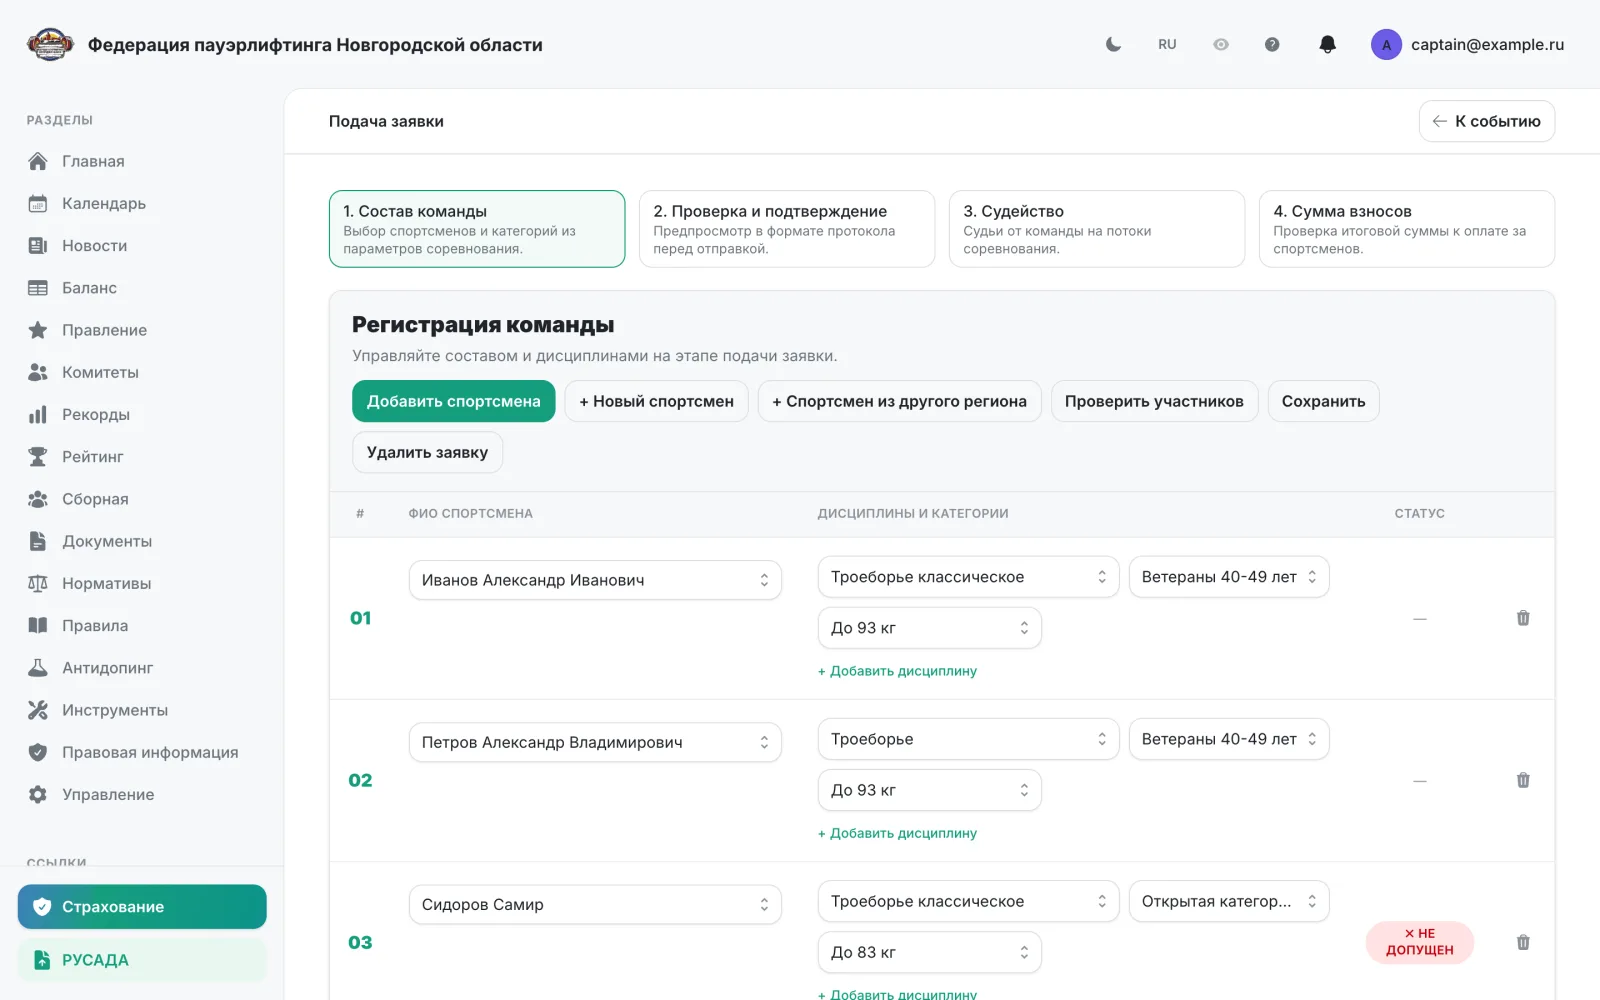
Шаг «Состав команды»: добавьте спортсменов, укажите дисциплины, возрастные группы и весовые категории.
- 3
Спортсмена, которого ещё нет в справочнике, можно предложить прямо из формы заявки.
- 4
Кнопка «+ Спортсмен из другого региона» заявляет спортсмена по временной прописке: найдите его по всей стране, укажите город проживания в вашем регионе и приложите документ о временной прописке — она должна действовать на дату соревнования.
- 5
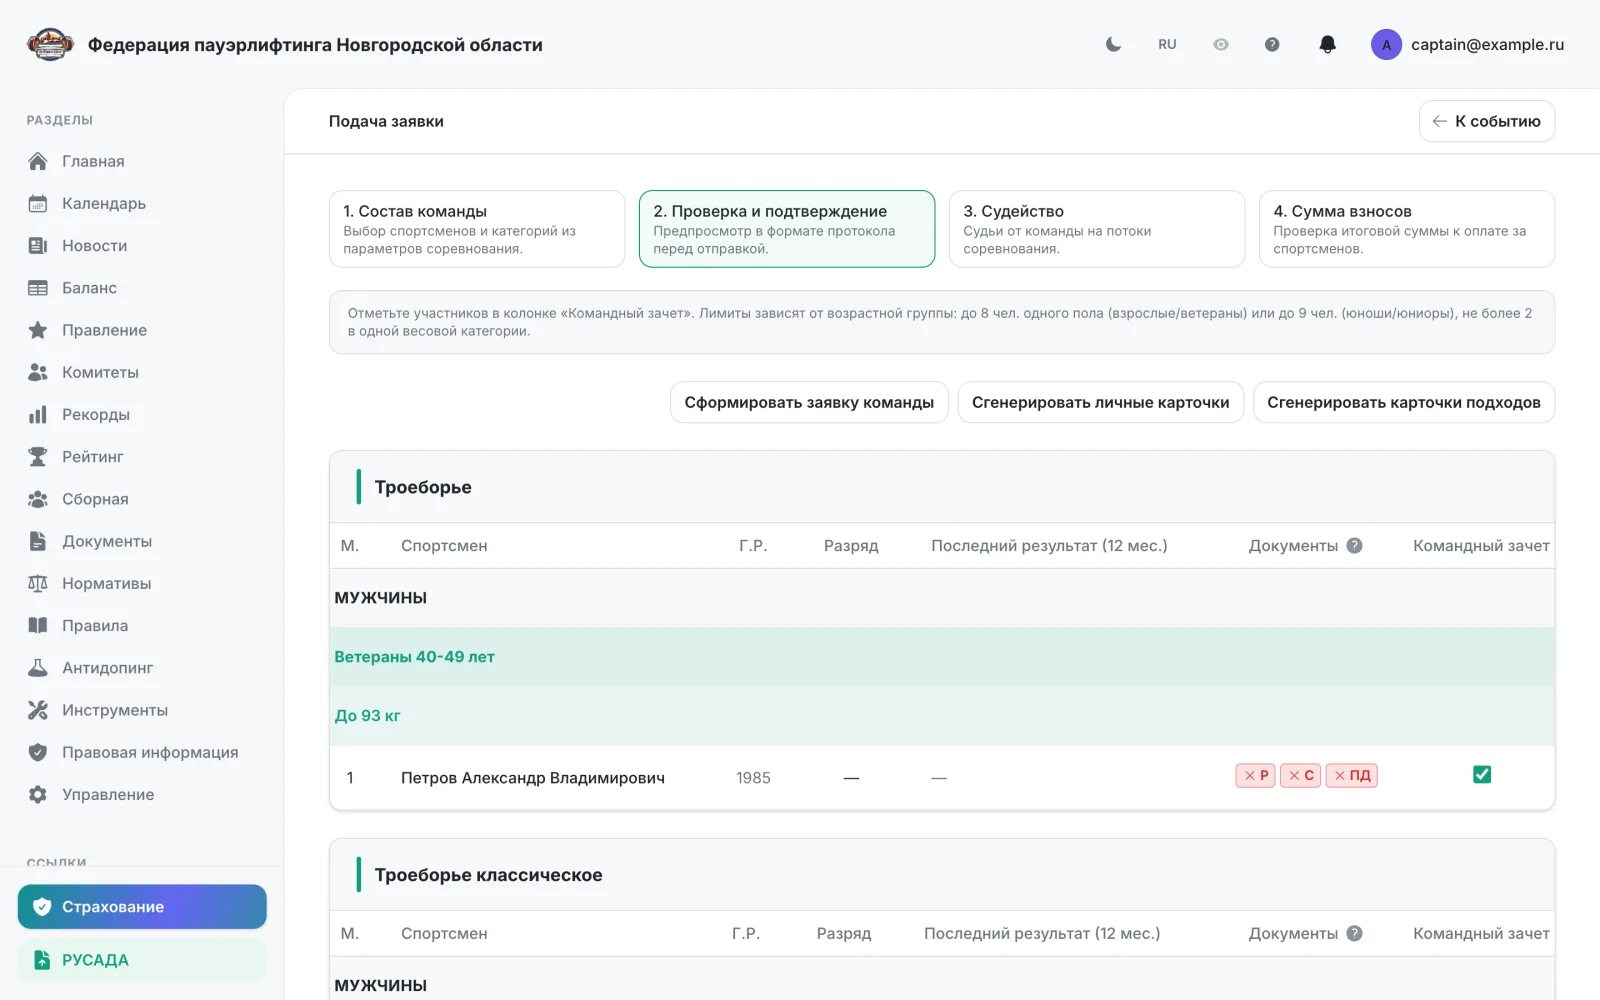
Шаг «Проверка и подтверждение»: просмотрите заявку целиком. У каждого спортсмена — метки документов допуска: «Р» — сертификат РУСАДА, «С» — страховка, «ПД» — согласие на персональные данные. Зелёная метка — документ есть, красная — нет; метку с документом можно нажать и скачать его.
- 6
Шаг «Судейство» появляется, если организатор требует судей от команд — заявите судей на потоки.
- 7
Если организатор включил страхование, перед взносами появится шаг «Страхование» — оформите полисы на спортсменов, см. раздел «Страхование в заявке».
- 8
Шаг «Сумма взносов»: проверьте итоговую сумму и отправьте заявку.
Важно: Черновик заявки сохраняется автоматически. Заявку можно править до конца приёма правок, заданного организатором.
Страхование в заявке
СпортсменКапитан командыОформление полисов на спортсменов прямо из мастера заявки — если организатор включил страхование на соревновании.
- 1
Шаг «Страхование» появляется в мастере заявки перед шагом взносов, если организатор включил страхование. Вверху показаны страховая компания федерации, страховая сумма и период действия полиса.
- 2
Отметьте спортсменов, которых нужно застраховать; у кого полис уже есть — бейдж «Застрахован». Проверьте фамилию, имя и дату рождения: эти данные попадут в полис.
- 3
Выберите, куда отправить полисы. «На почту подающего заявку» — все полисы придут на одну почту, оплата одной ссылкой. «Каждому спортсмену на свою почту» — у каждого будет отдельный заказ и своя ссылка на оплату; потребуется почта каждого спортсмена.
- 4
Заполните данные страхователя — совершеннолетнего, который оформляет и оплачивает полисы, — и контактные почту и телефон.
- 5
Нажмите «Рассчитать стоимость» — платформа покажет итоговую сумму с разбивкой на взрослых и детей.
- 6
Нажмите «Оформить и оплатить» и оплатите заказ по ссылке. Статусы заказов видны в блоке «Заказы»; неоплаченный заказ можно отменить.
- 7
После оплаты полисы выпускаются автоматически и появляются в личных документах спортсменов; скачать полис можно прямо из заказа.
Важно: Шаг страхования необязателен — заявку можно отправить и без полисов. Организатор включает страхование на седьмом шаге редактирования соревнования, а условия — компания, страховая сумма, тип полиса — общие для всей федерации и задаются в админке.
Проверка заявок организатором
ОрганизаторПриём и отклонение заявок, пересборка номинации.
- 1
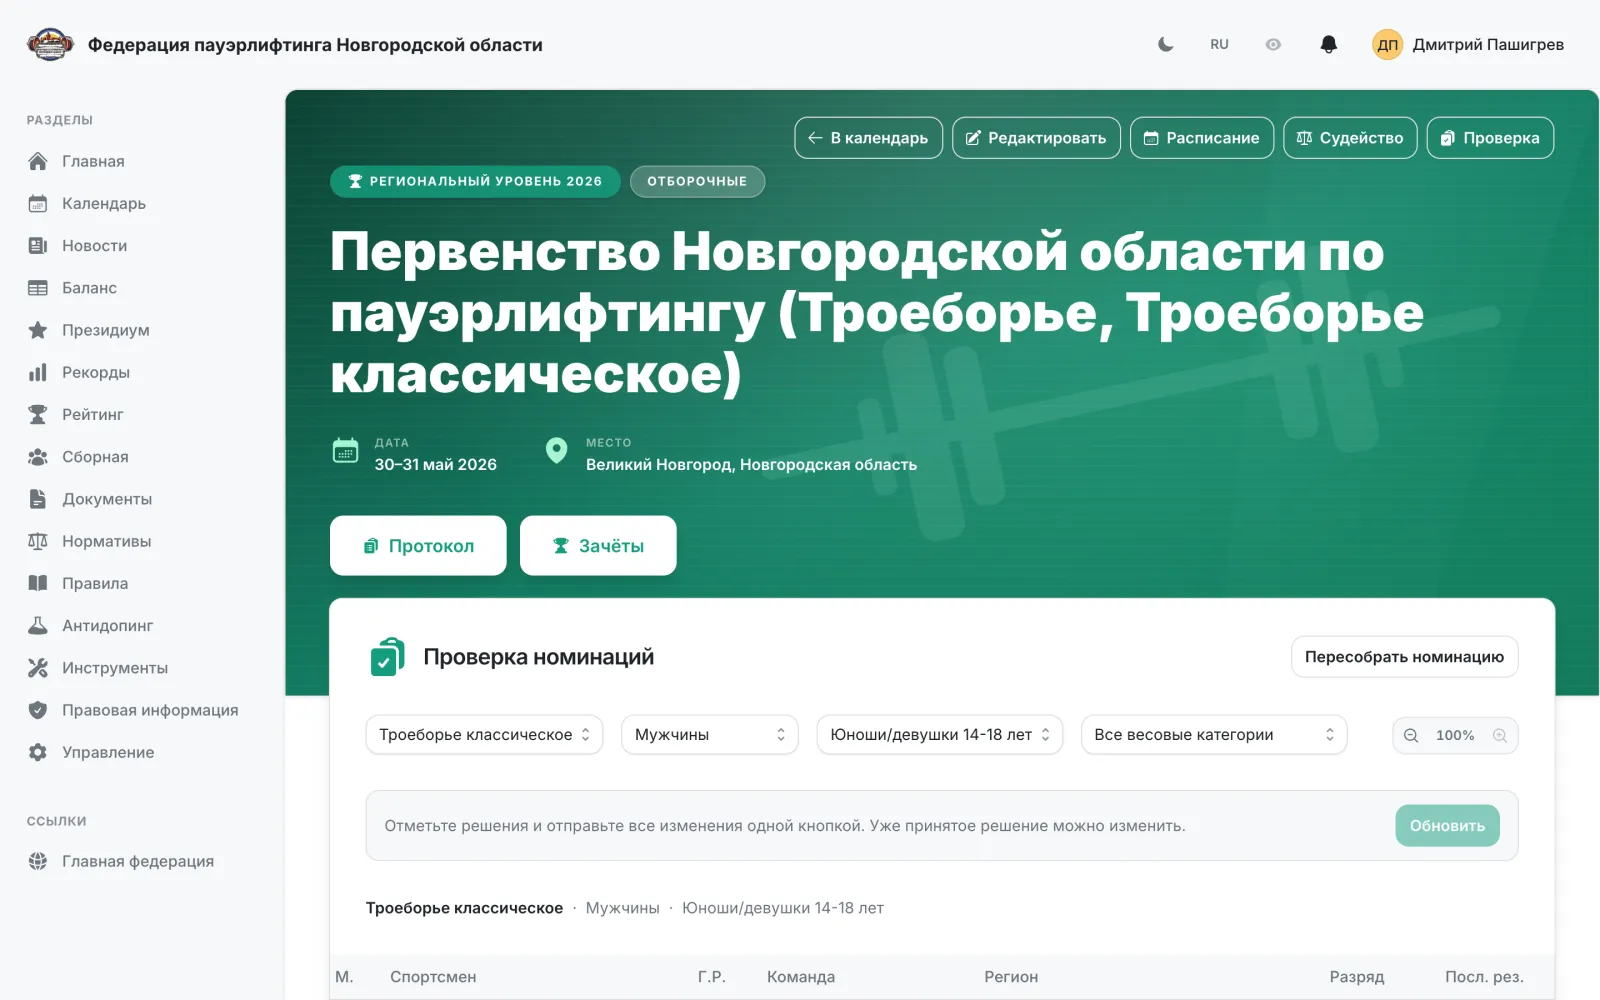
Откройте соревнование и нажмите «Проверка».
- 2
Отфильтруйте список по дисциплине, полу, возрастной группе и весовой категории.
- 3
Ориентируйтесь на метки документов допуска у каждого спортсмена: «Р» — сертификат РУСАДА, «С» — страховка, «ПД» — согласие на персональные данные. Зелёная метка — документ есть, красная — нет; метку с документом можно нажать и скачать его.
- 4
По каждому участнику отметьте решение — «Одобрить» или «Отклонить».
- 5
Отправьте все решения одной кнопкой; уже принятое решение можно изменить.
- 6
После изменений нажмите «Пересобрать номинацию», чтобы обновить распределение по категориям.
Важно: При отклонении участника нужно указать причину — она будет видна тому, кто подал заявку.
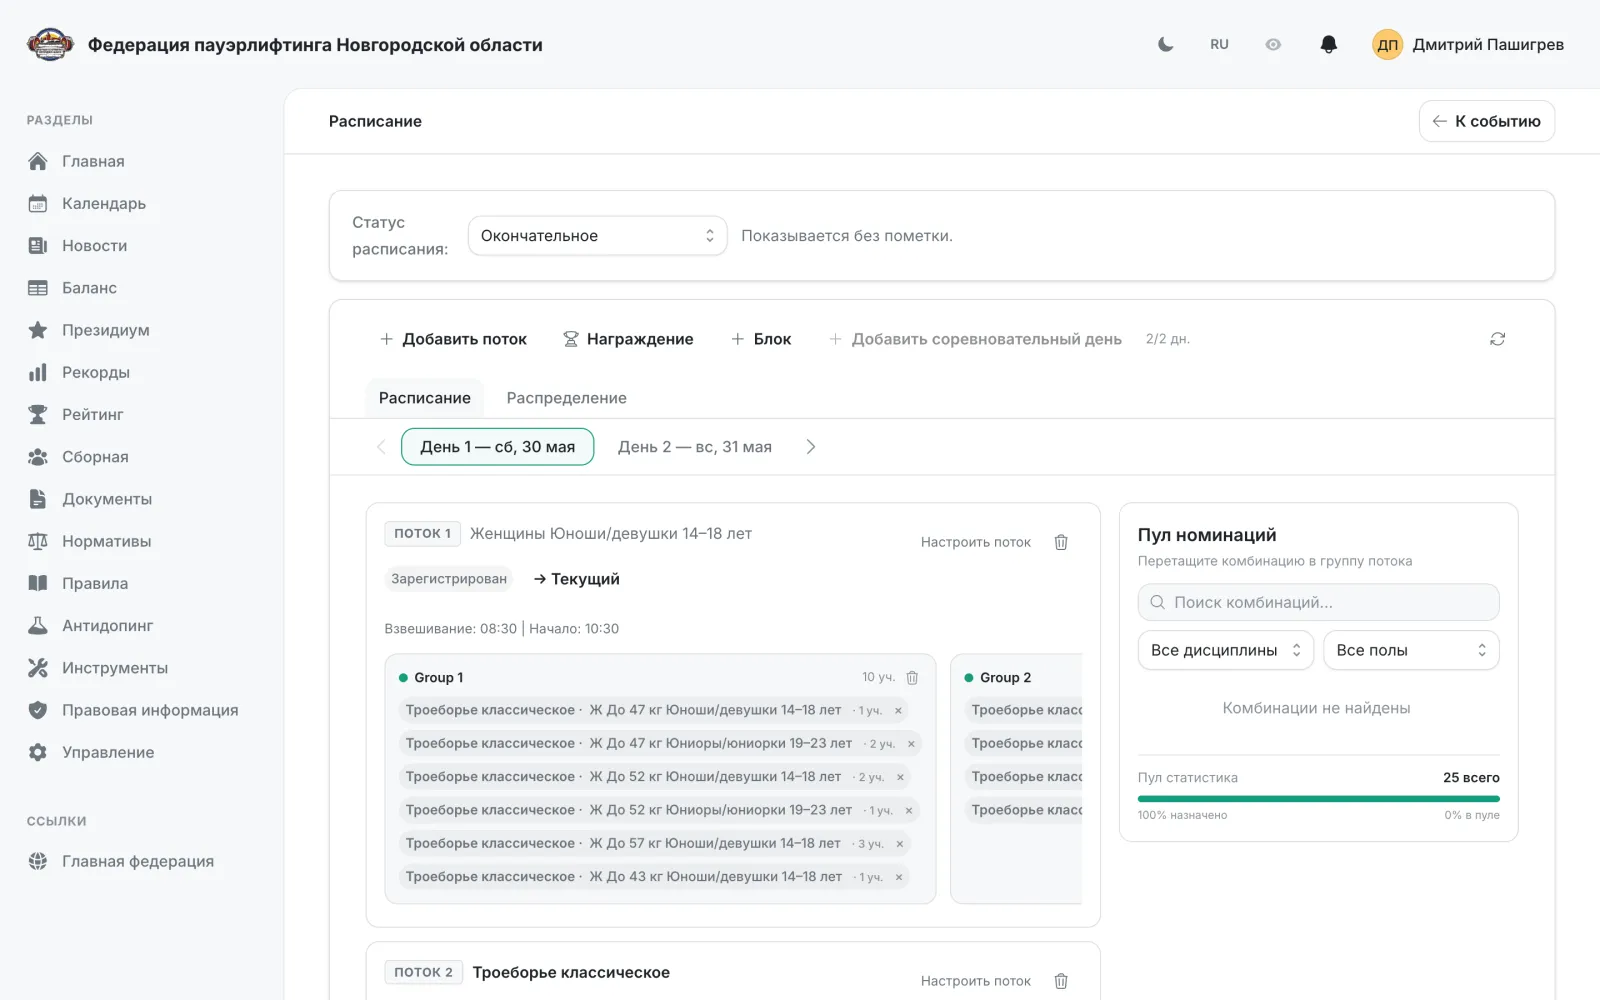
Расписание и потоки
ОрганизаторПотоки, группы, блоки награждения и распределение номинаций по дням.
- 1
Откройте соревнование и нажмите «Расписание».
- 2
Задайте «Статус расписания»: черновик или окончательное.
- 3
Добавьте потоки кнопкой «Добавить поток», а также блоки награждения и перерывы.
- 4
Для каждого потока задайте время взвешивания и время начала через «Настроить поток».
- 5
На вкладке «Распределение» перетащите комбинации из «Пула номинаций» в группы потоков.
- 6
Следите за статистикой пула — она показывает, какая доля комбинаций уже назначена.
Важно: Пока статус расписания не выставлен, расписание не отображается на странице соревнования.
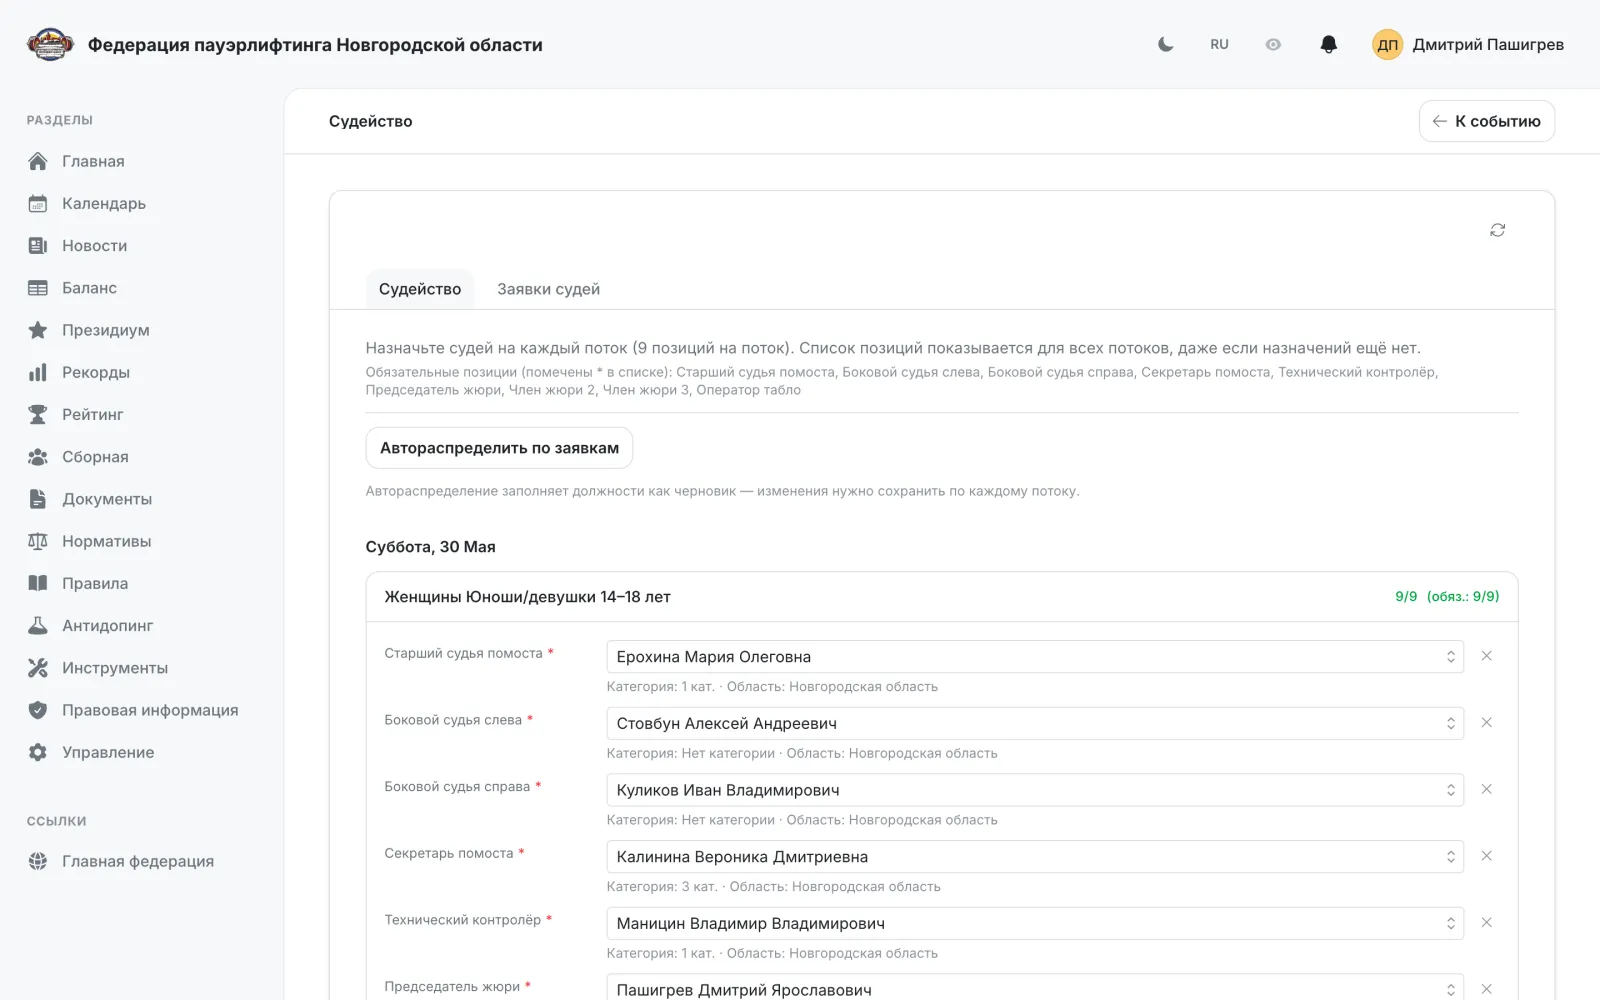
Судейство на соревновании
ОрганизаторЗаявки судей от команд и их распределение по потокам.
- 1
Откройте соревнование и нажмите «Судейство».
- 2
Вкладка «Заявки судей» показывает судей, заявленных командами.
- 3
Кнопка «Автораспределить по заявкам» расставляет судей по потокам автоматически.
- 4
Проверьте счётчики у каждого потока: они показывают назначено и обязательное количество.
- 5
Нажмите «Сохранить назначения».
Важно: Требования к судьям от команд задаются на шаге 6 мастера соревнования.
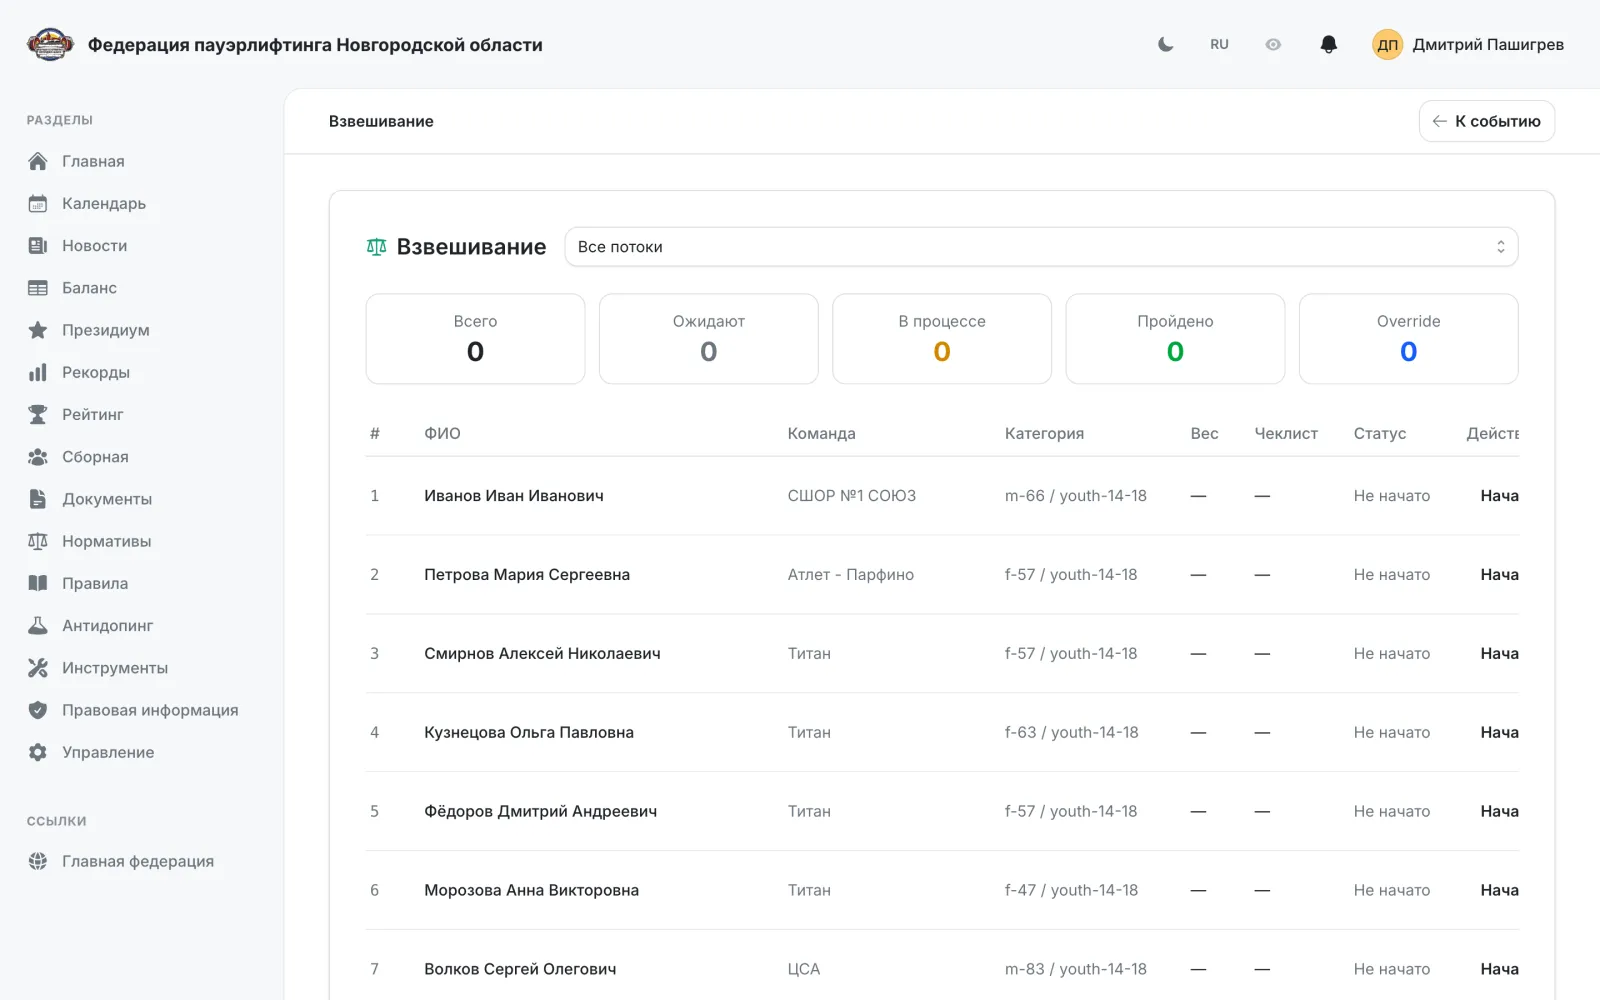
Взвешивание
ОрганизаторФиксация результатов взвешивания по потокам.
- 1
Откройте страницу взвешивания соревнования.
- 2
Выберите поток из списка «Все потоки».
- 3
Нажмите «Начать», чтобы открыть взвешивание выбранного потока.
- 4
Внесите результаты взвешивания участников.
Важно: Кнопки перехода на страницу взвешивания в интерфейсе пока нет — раздел открывается по прямой ссылке вида /events/ID-события/weigh-in.
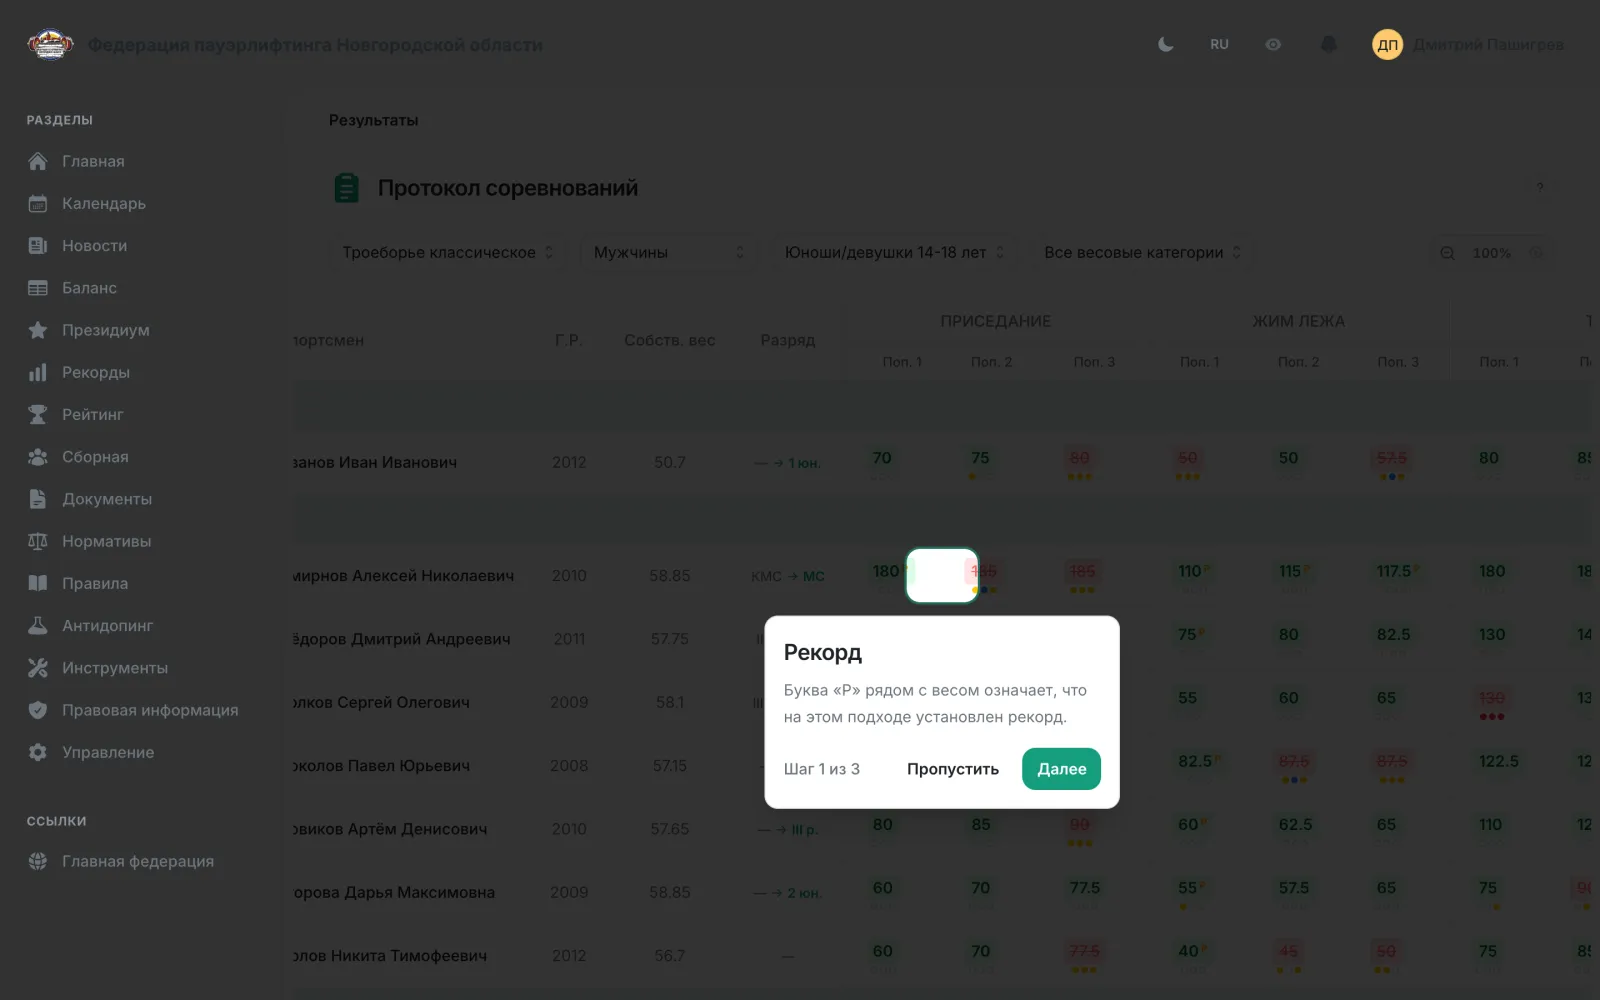
Результаты, протоколы и зачёты
СпортсменКапитан командыОрганизаторАдминистратор федерацииПросмотр номинации и результатов, выгрузка PDF, онлайн-протокол.
- 1
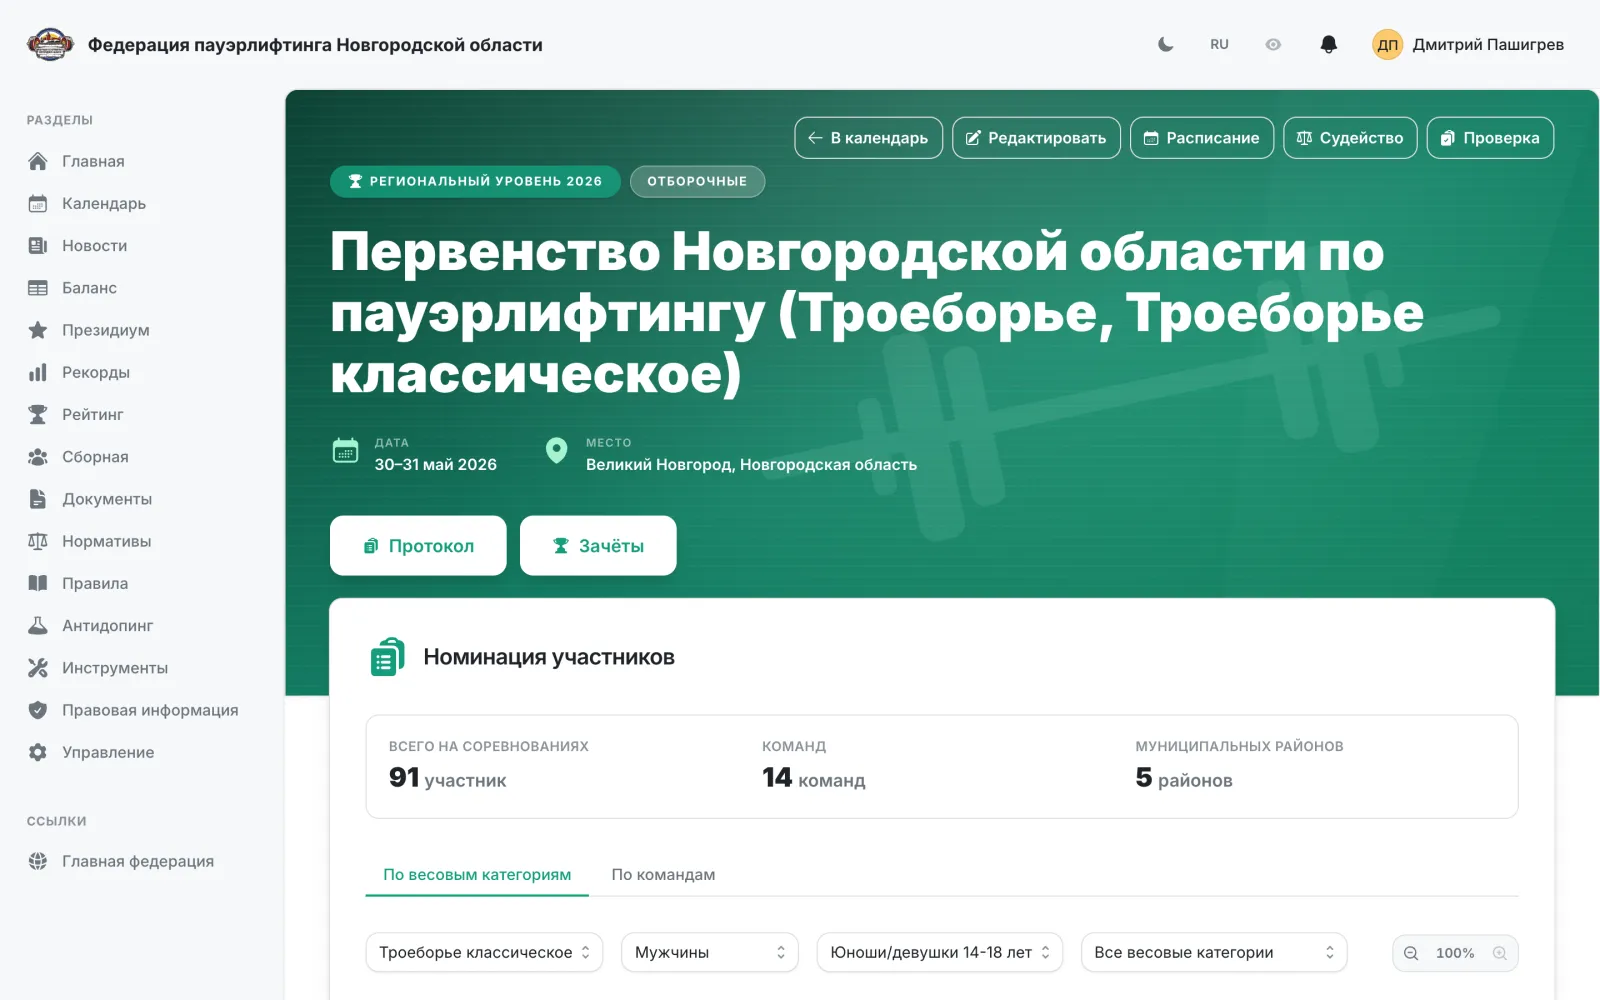
На странице соревнования доступны разделы «Протокол» и «Зачёты».
- 2
Таблицы можно масштабировать кнопками увеличения и уменьшения.
- 3
Кнопки «Расписание · PDF», «Судейство · PDF» и «Номинация · PDF» открывают готовый документ в новой вкладке — оттуда его можно распечатать или сохранить.
- 4
Онлайн-протокол показывает ход соревнования в реальном времени.
Важно: Кнопки выгрузки PDF видны только пользователям с правами на это соревнование.
Справочники: спортсмены, тренеры, судьи, команды
Администратор федерацииРаздел «Баланс» — единый реестр людей и команд федерации.
- 1
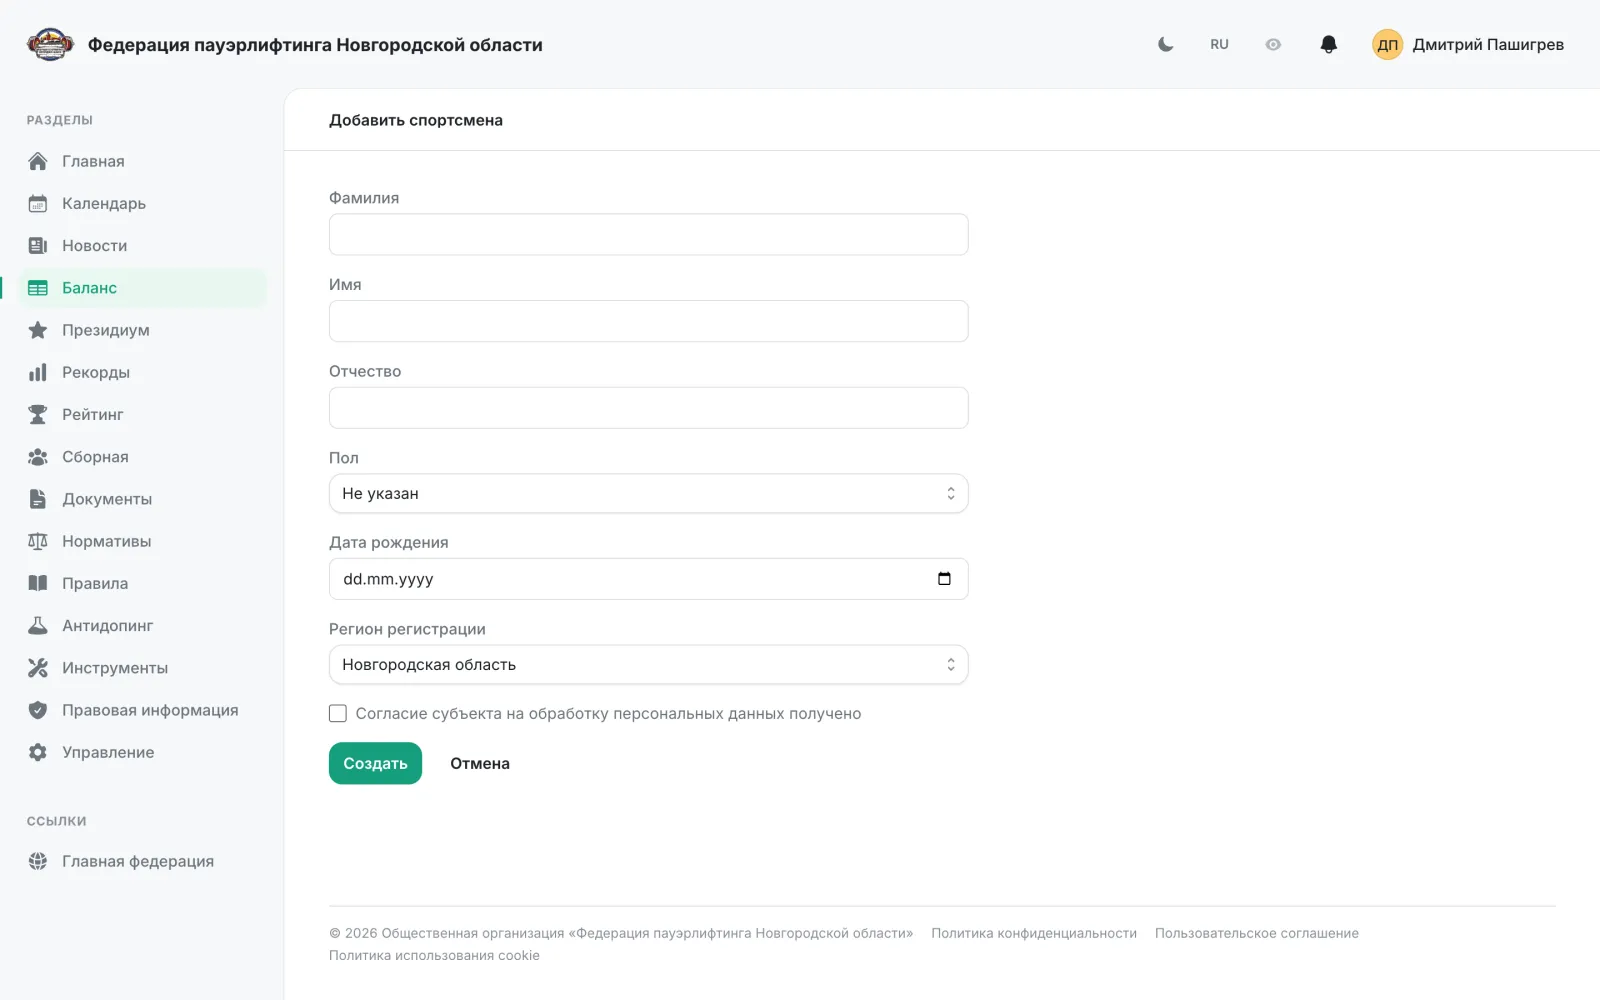
Откройте «Баланс» в левом меню.
- 2
Переключайтесь между вкладками «Спортсмены», «Тренеры», «Судьи» и «Команды».
- 3
Нажмите «Создать», чтобы добавить запись.
- 4
Для спортсмена заполните фамилию, имя, отчество, пол, дату рождения и регион регистрации.
- 5
Подтвердите, что получено согласие субъекта на обработку персональных данных, и нажмите «Создать».
Важно: Список реестра открыт всем посетителям, а создание и редактирование записей доступно только пользователям с правами.

Документы федерации
Администратор федерацииПоложения, приказы и другие файлы, публикуемые на сайте.
- 1
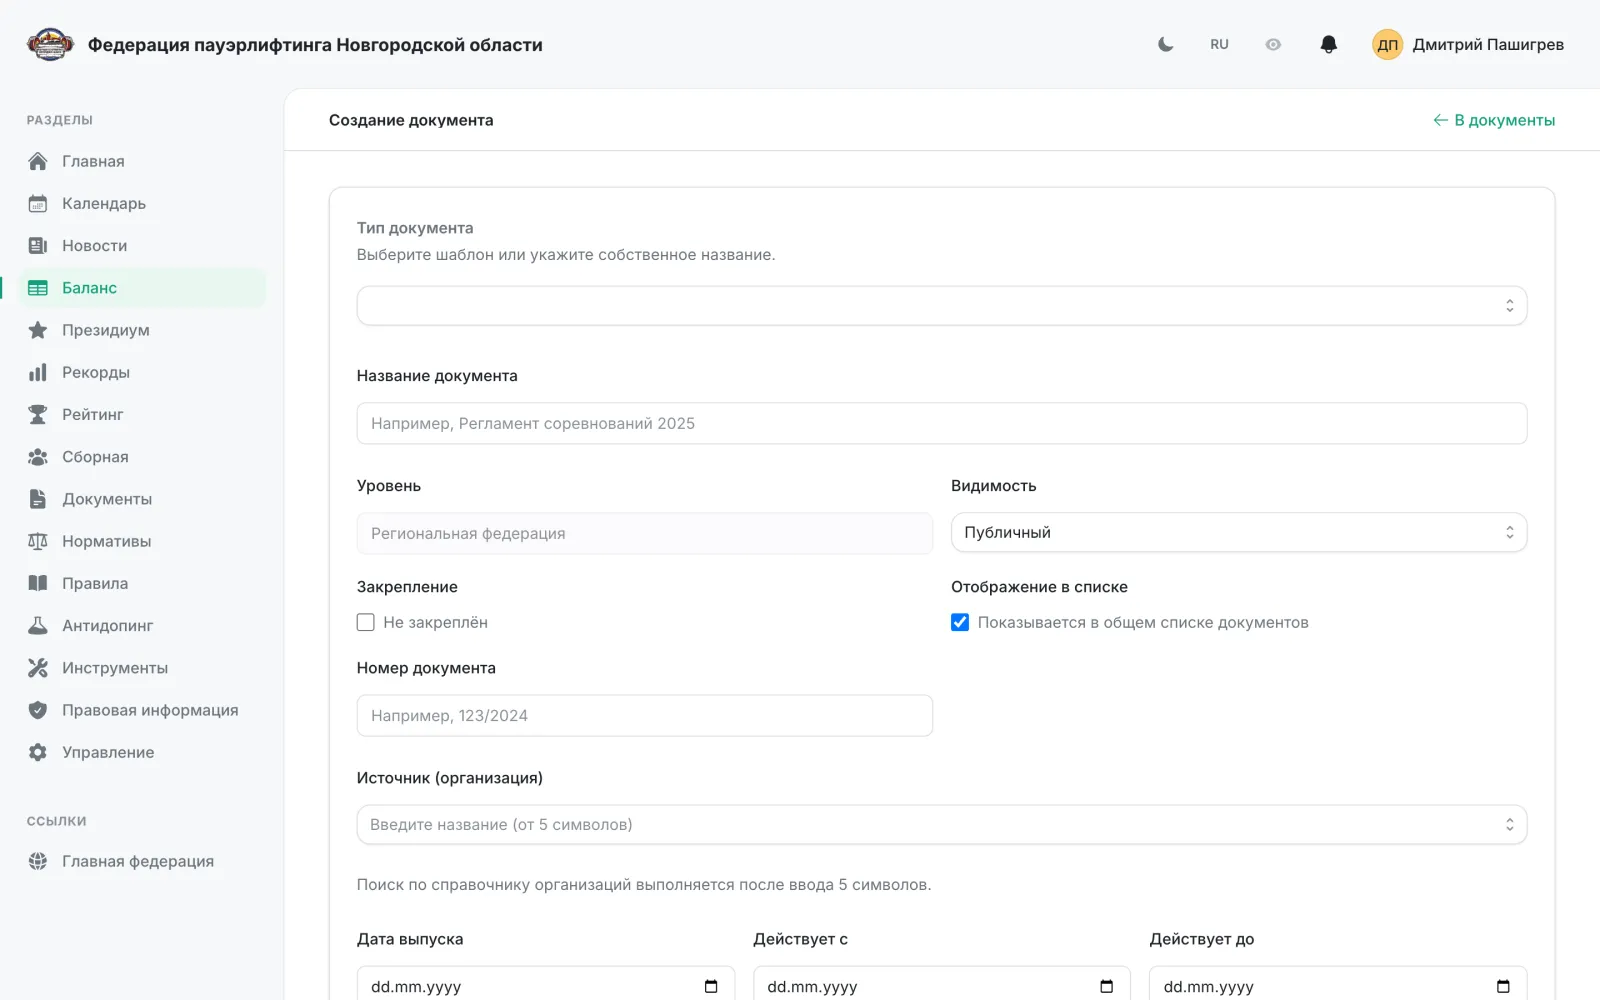
Откройте «Документы» в левом меню.
- 2
Нажмите кнопку добавления документа.
- 3
Заполните название, уровень, видимость, номер документа, источник и даты действия.
- 4
Загрузите файл — поддерживаются PDF, DOCX, XLSX и ZIP.
- 5
Сохраните документ.
Важно: Поле «Видимость» определяет, будет ли документ публичным. Создание, изменение и удаление документов управляются отдельными правами.
Приказ о присвоении разряда
Администратор федерацииЗагрузка приказа и присвоение по нему спортивных разрядов и судейских категорий.
- 1
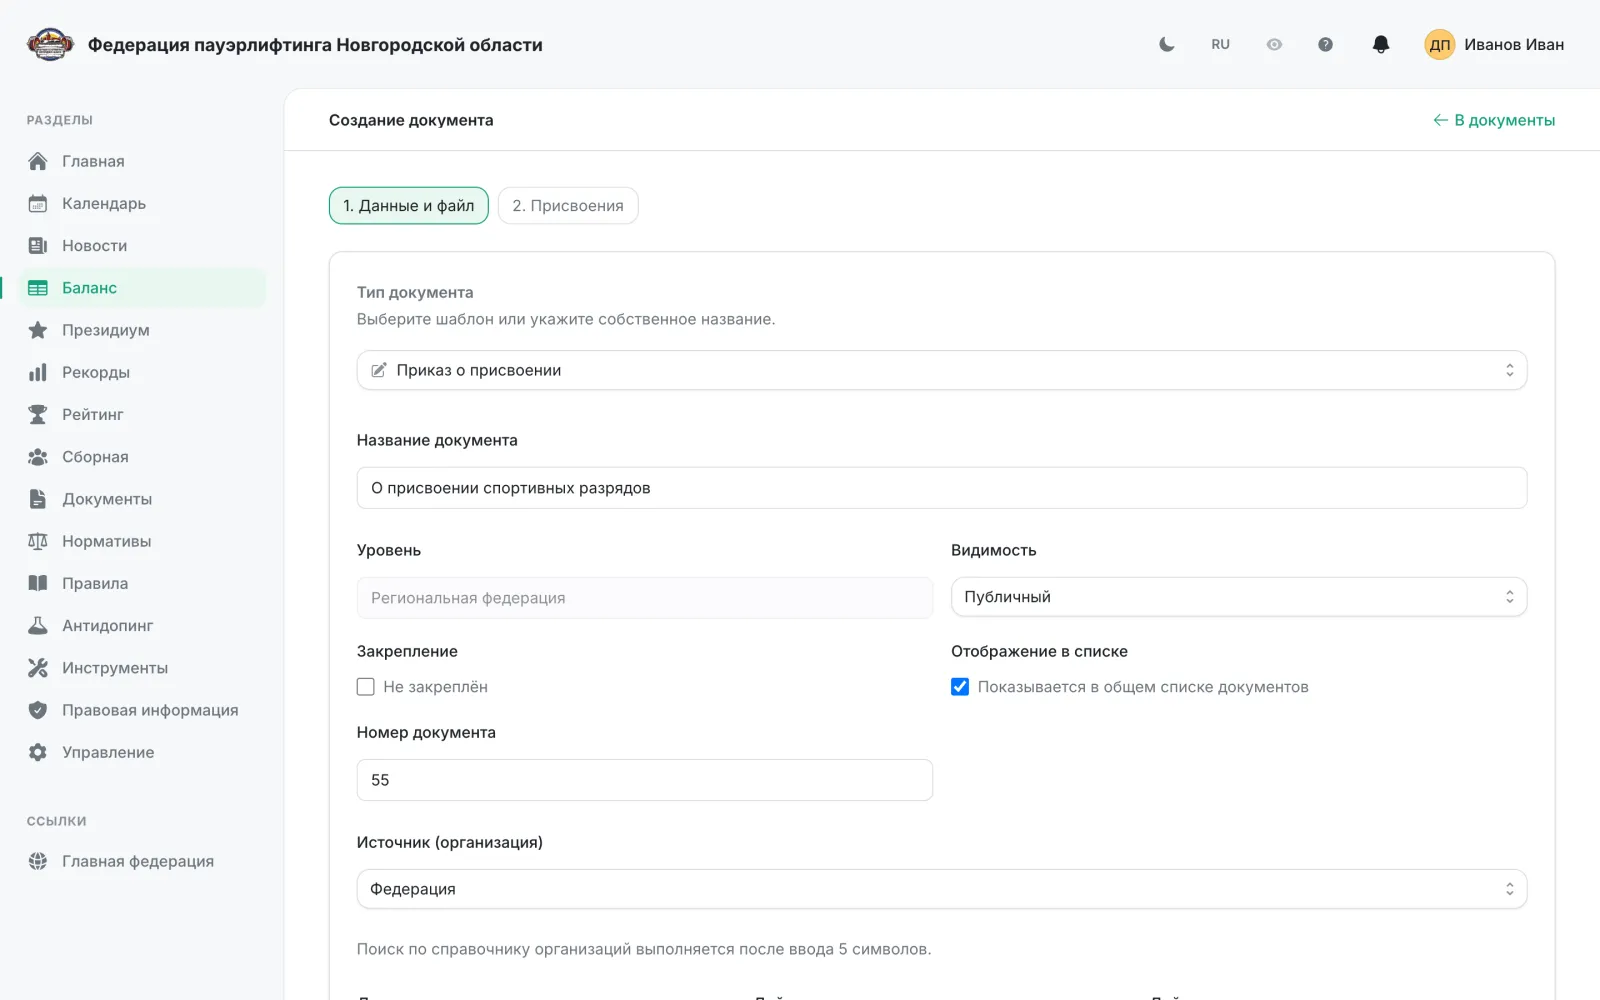
Откройте «Документы» и нажмите «Добавить документ».
- 2
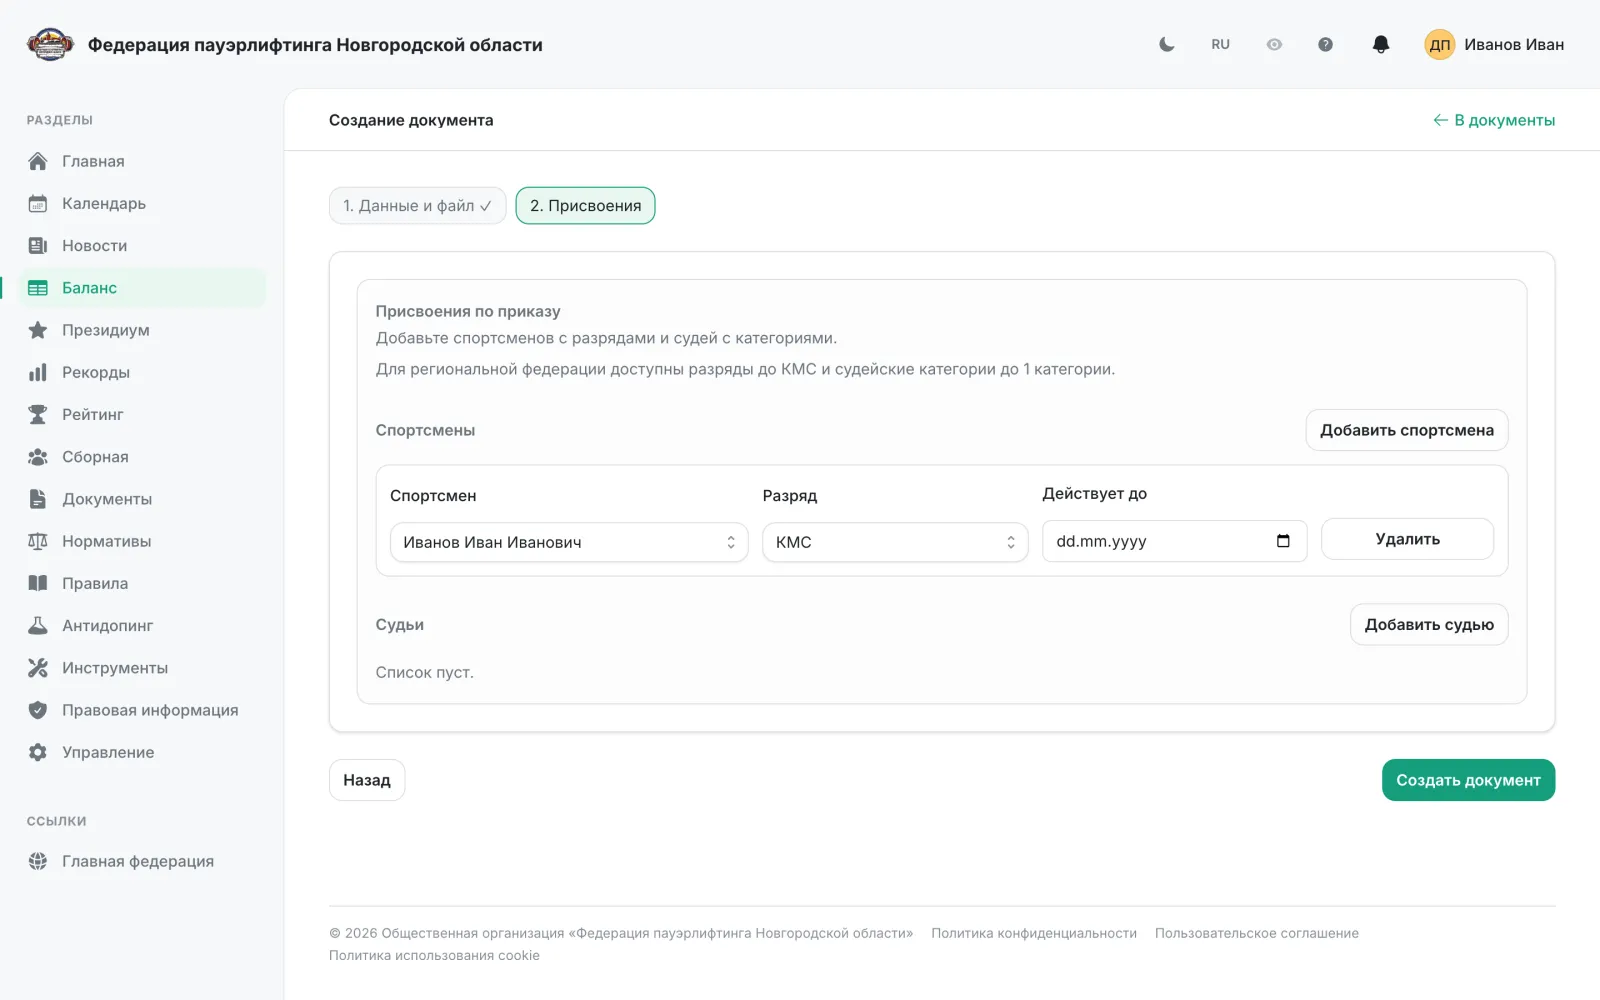
В поле «Тип документа» выберите «Приказ о присвоении» — форма превратится в мастер из двух шагов: «1. Данные и файл» и «2. Присвоения».
- 3
Заполните «Название документа» и «Номер документа». Поле «Уровень» подставляется по сайту федерации и не редактируется.
- 4
Укажите «Источник (организация)» — орган, издавший приказ. Поиск по справочнику начинается после ввода 5 символов; для приказа организация обязательна.
- 5
Заполните «Дата выпуска» и, если нужно, «Действует с» и «Действует до»: от этих дат считается срок действия присваиваемых разрядов.
- 6
Загрузите файл приказа — PDF, DOCX, XLSX или ZIP до 20 МБ. Пока файл не загружен, документ остаётся черновиком и его нельзя скачать.
- 7
Нажмите «Далее» и перейдите на шаг «2. Присвоения». Нажмите «Добавить спортсмена», найдите человека по ФИО (от 5 символов) и выберите «Разряд».
- 8
Поле «Действует до» заполняется автоматически по сроку действия разряда. Для МС, МСМК и ЗМС оно пустое и заблокировано — эти звания бессрочные; у юношеских разрядов срок обрезается днём перед 18-летием спортсмена.
- 9
Судейские категории добавляются так же — кнопкой «Добавить судью». В приказе должно быть хотя бы одно присвоение: спортсмену или судье.
- 10
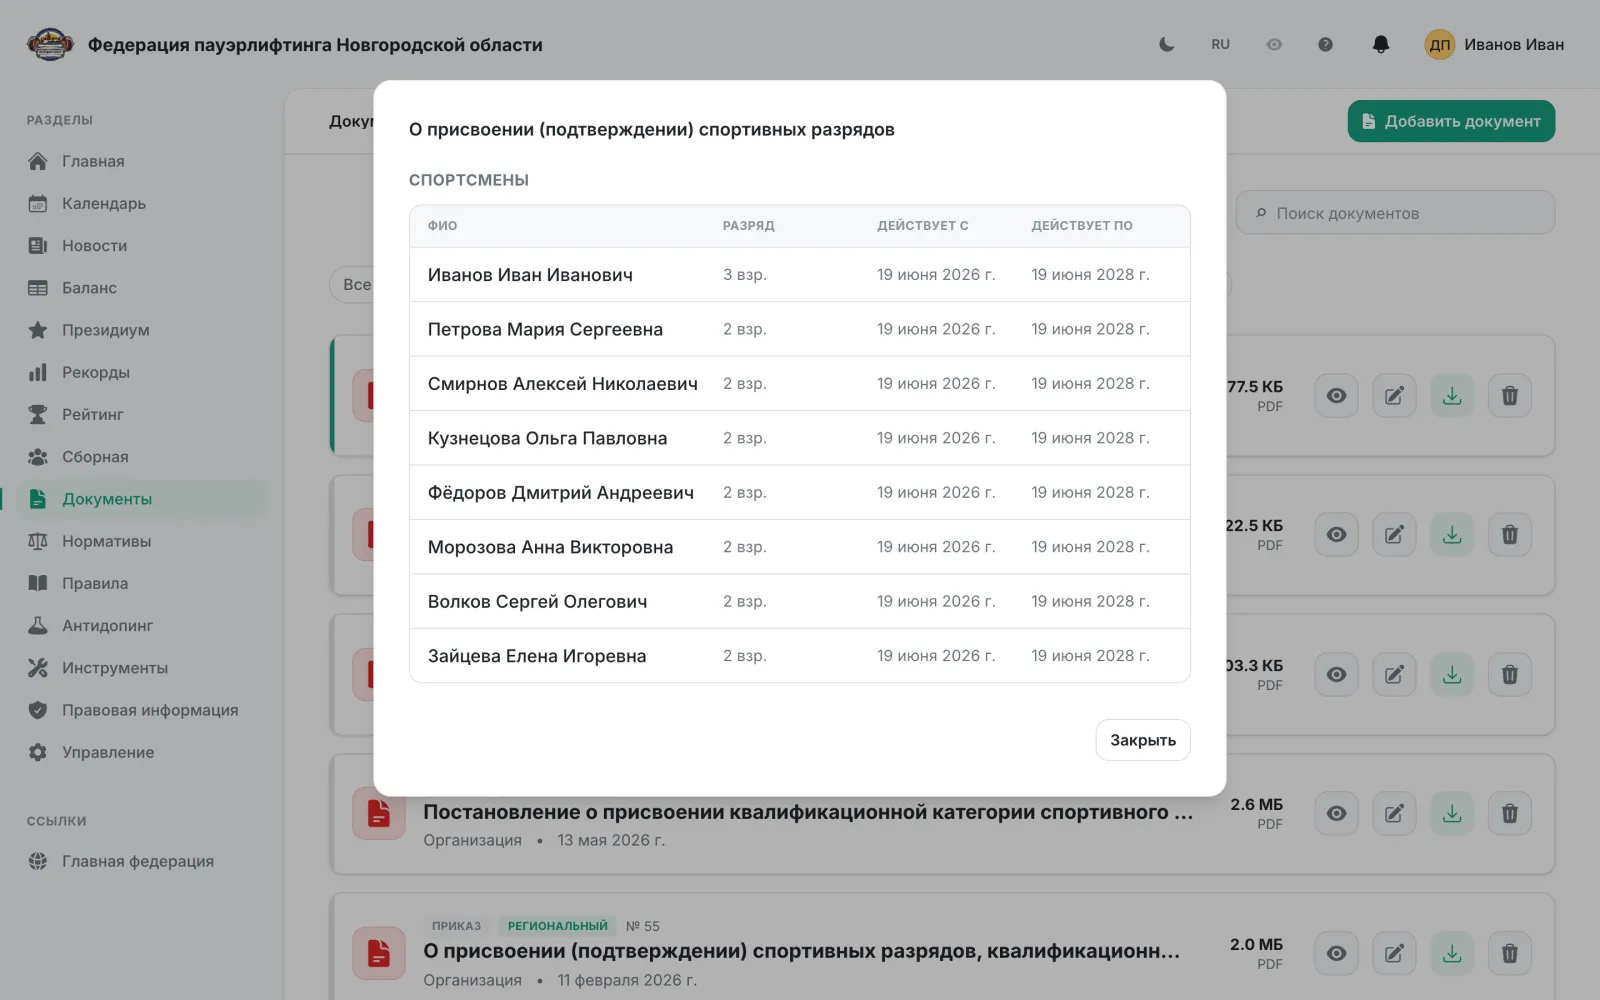
Сохраните документ. Разряды проставятся спортсменам автоматически: они появятся в карточке спортсмена и в колонке «Разряд/звание» реестра «Баланс», а на карточке приказа — иконка просмотра присвоений.
Важно: Региональной федерации доступны разряды до КМС и судейские категории до 1 категории; МС и выше присваивает всероссийская федерация. Повторное сохранение приказа полностью заменяет список присвоений и переприсваивает разряды заново, а приказ с датой раньше уже действующего присвоения не применяется. Поле «Спортивный разряд/звание» в карточке спортсмена — отдельный ручной путь: он не создаёт приказ и не попадает в историю разрядов.
Рекорды
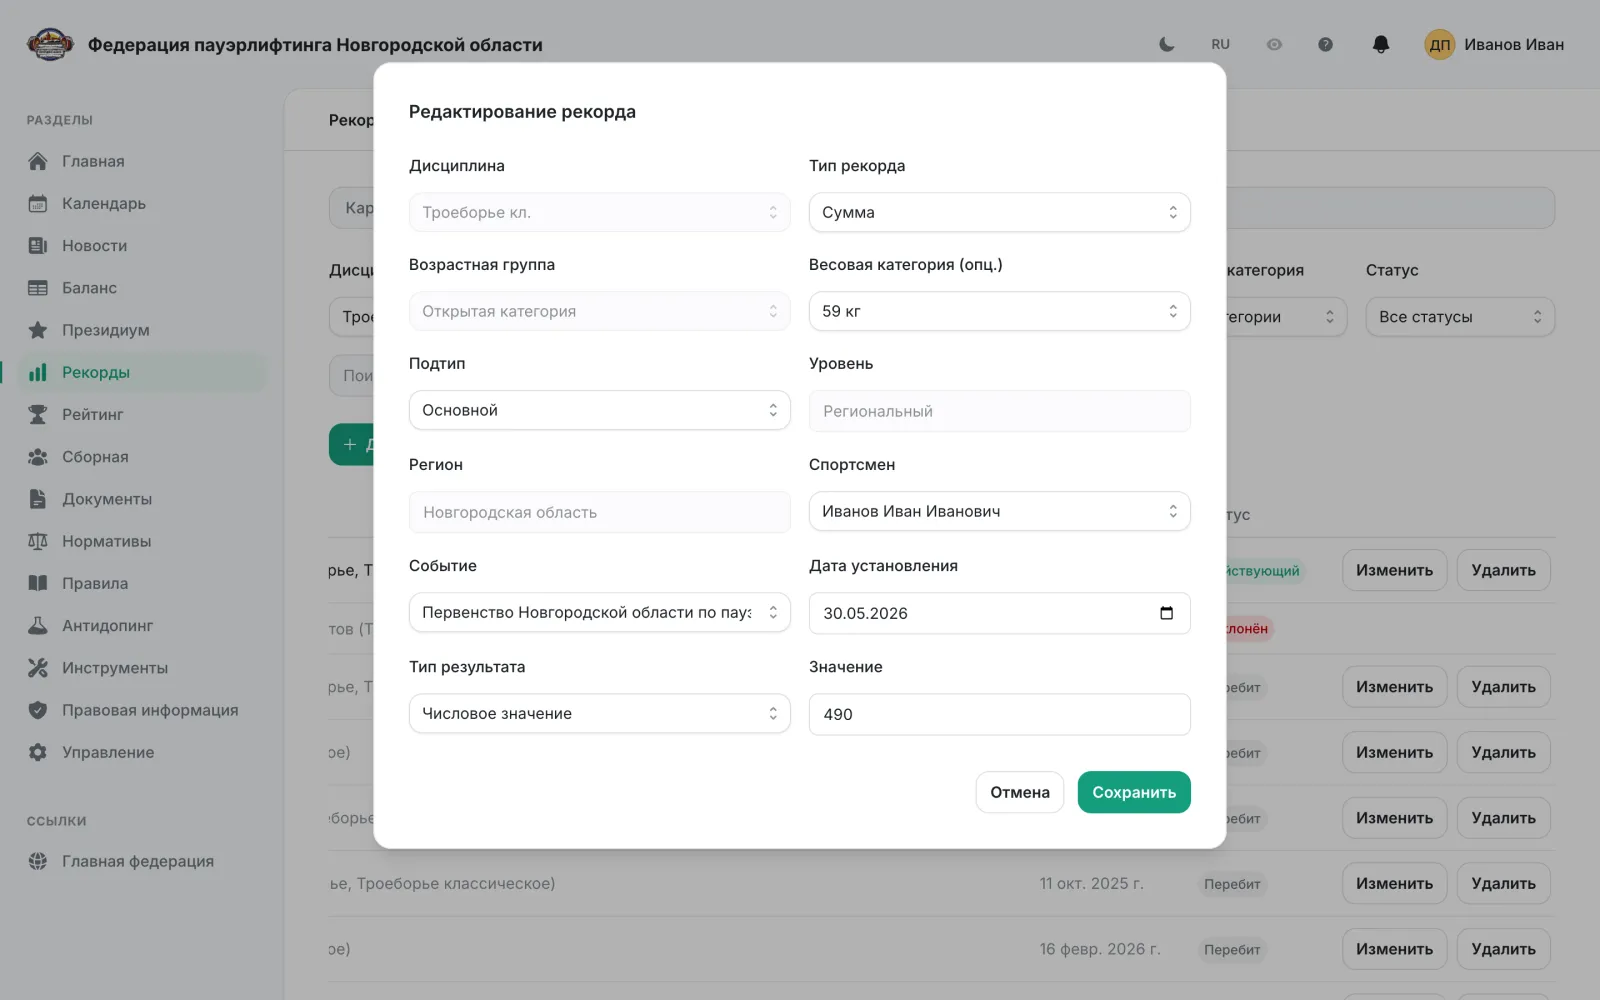
Администратор федерацииРеестр рекордов федерации: просмотр карточками, работа в таблице, добавление, изменение и снятие с публикации.
- 1
Откройте «Рекорды» в левом меню. По умолчанию рекорды показаны карточками — по полу, дисциплине, возрастной группе и весовой категории.
- 2
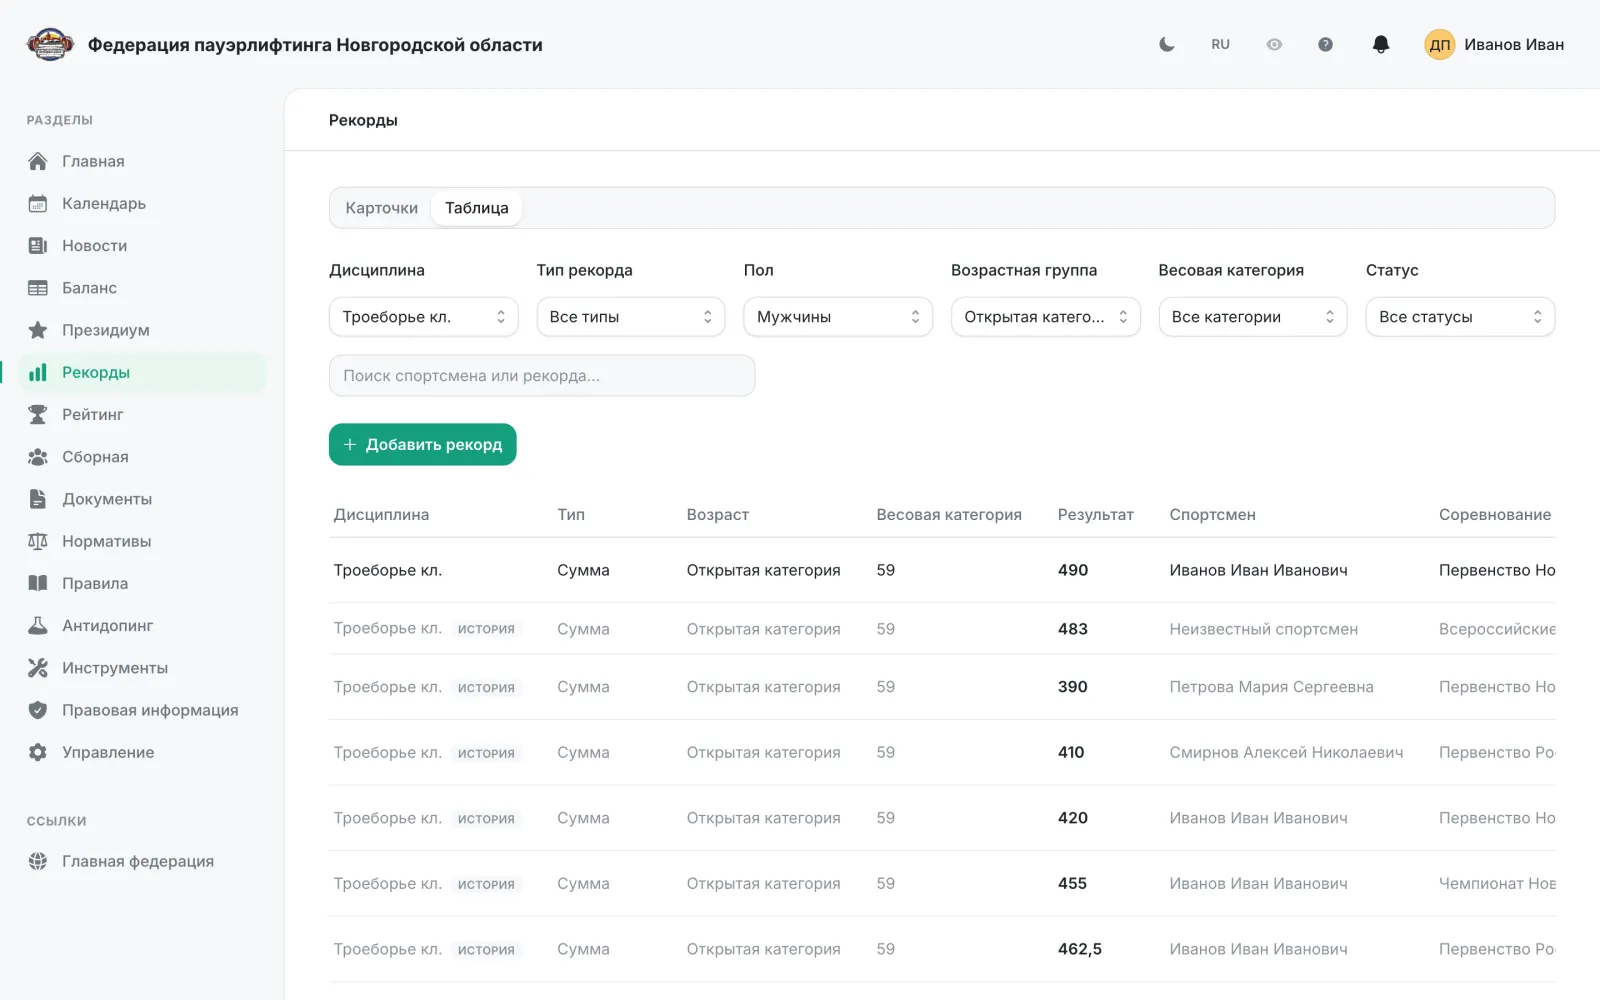
Если у вас есть права на управление рекордами, над списком появляется переключатель «Карточки» / «Таблица». Таблица — рабочий режим: в ней видны все записи, включая перебитые и отклонённые.
- 3
Отфильтруйте список: дисциплина, тип рекорда, пол, возрастная группа, весовая категория и статус. Поле поиска ищет по фамилии спортсмена и по значению рекорда.
- 4
Статусы: «Действующий», «На проверке», «Перебит», «Черновик», «Отклонён». Строки с пометкой «История» — прошлые рекорды той же категории, их тоже можно править.
- 5
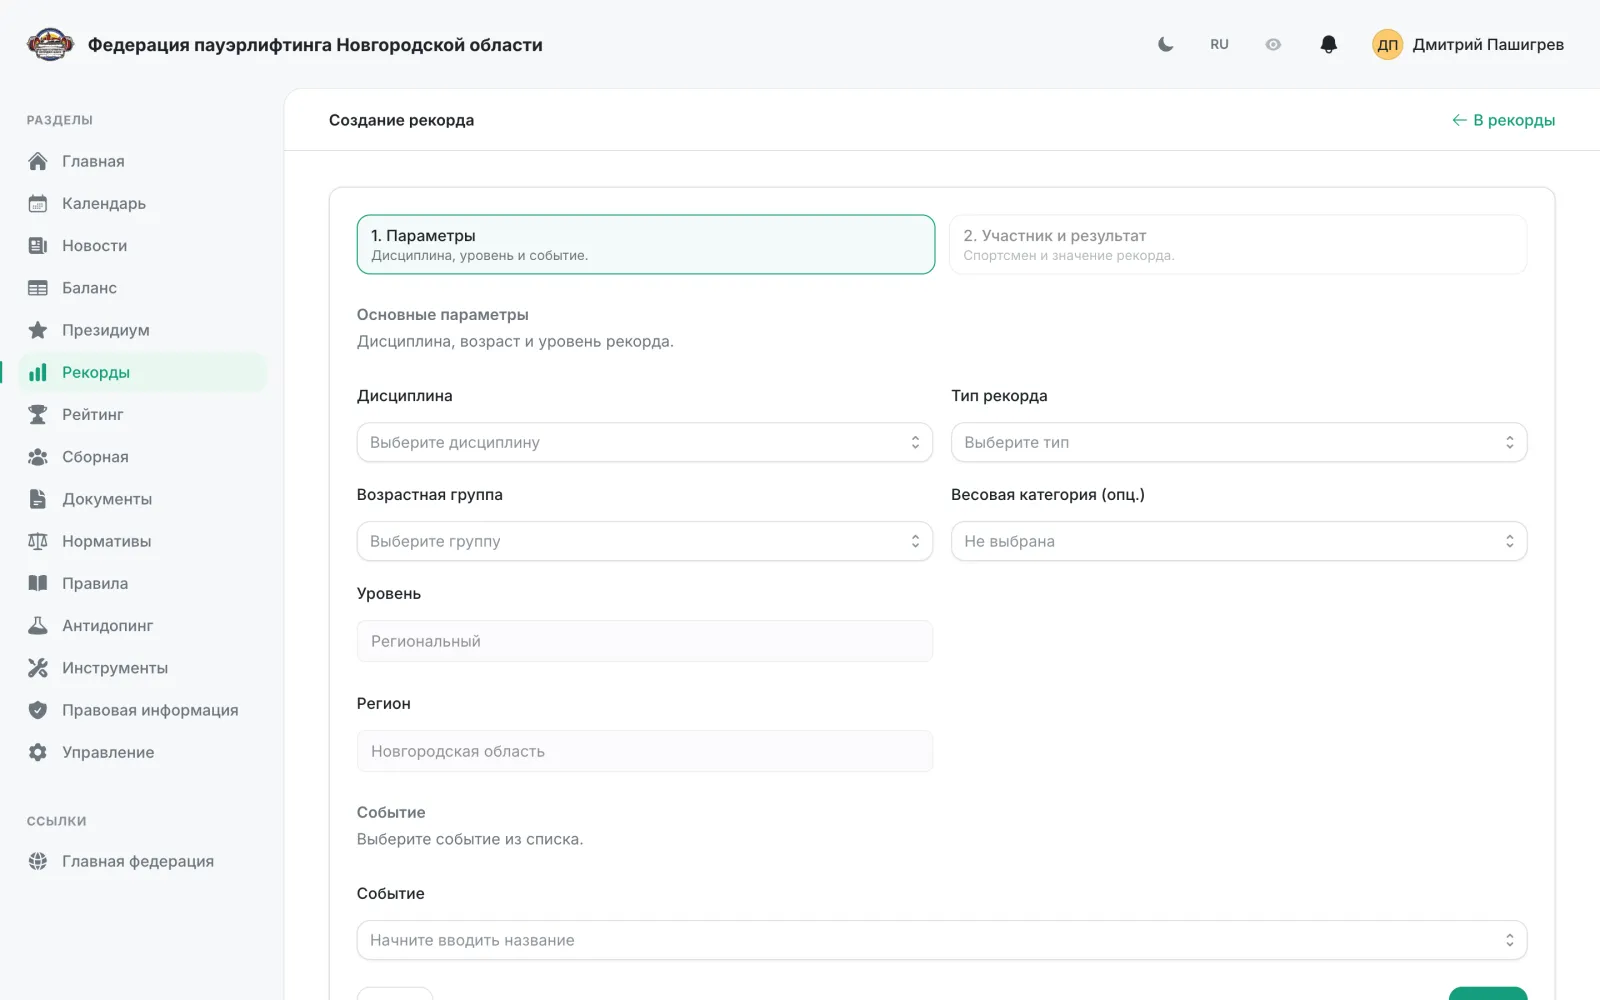
Нажмите «Добавить рекорд». В карточном виде та же ссылка открывает мастер из двух шагов, в таблице — форму в диалоге; поля одинаковые.
- 6
Заполните дисциплину, тип рекорда, возрастную группу, весовую категорию (необязательно) и подтип. «Уровень» и «Регион» подставляются по сайту федерации и не редактируются.
- 7
Выберите событие и спортсмена — оба списка ищут по вводу от 5 символов в пределах региона или страны сайта.
- 8
Укажите «Тип результата» — числовое значение, время в секундах или миллисекундах либо текст — и само значение. Дробную часть можно писать через запятую.
- 9
«Изменить» в строке таблицы открывает ту же форму. Дисциплина, возрастная группа, уровень и регион при редактировании недоступны, зато появляется поле «Дата установления».
- 10
«Удалить» снимает рекорд с публикации: запись переходит в статус «Отклонён», но остаётся в базе и в истории изменений.
Важно: Удаление действующего рекорда не возвращает предыдущий результат — категория остаётся без действующего рекорда, пока не добавлен новый. Записи со статусом «Отклонён» и мировые рекорды редактировать нельзя. Новости о региональных рекордах публикуются автоматически при импорте протокола из десктоп-приложения.
Сборная
Администратор федерацииСостав сборной, отображаемый на публичной странице.
- 1
Откройте «Сборная» в левом меню.
- 2
Добавьте спортсмена в состав через кнопку добавления.
- 3
При необходимости удалите участника из состава.
Управление федерацией
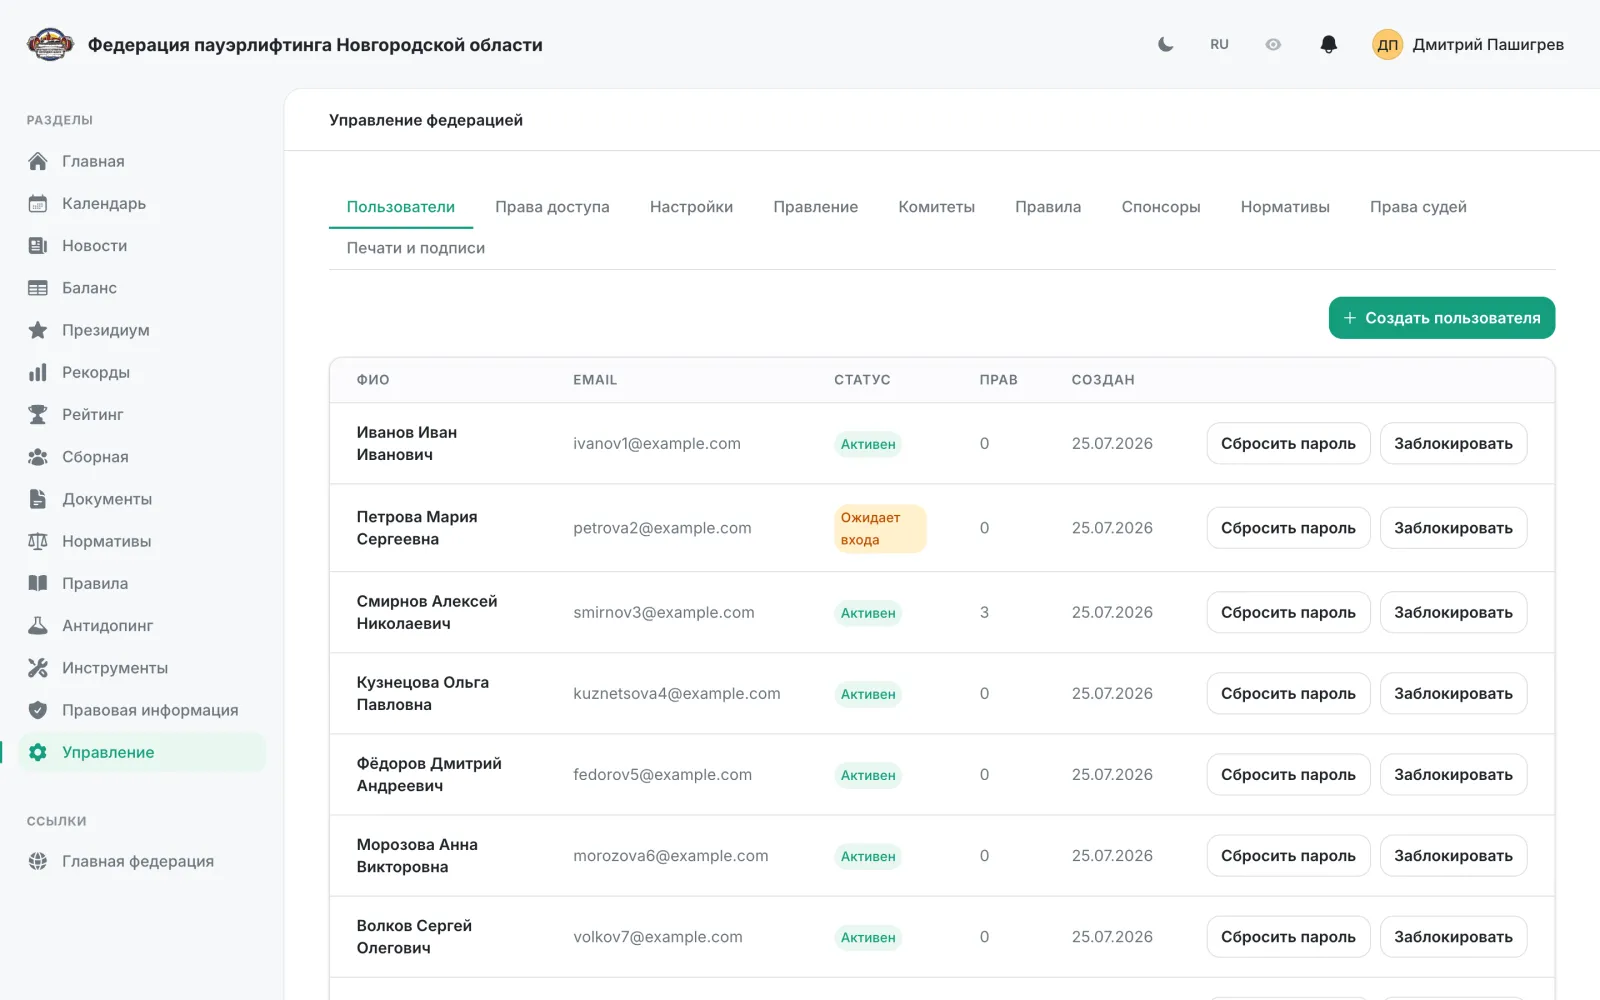
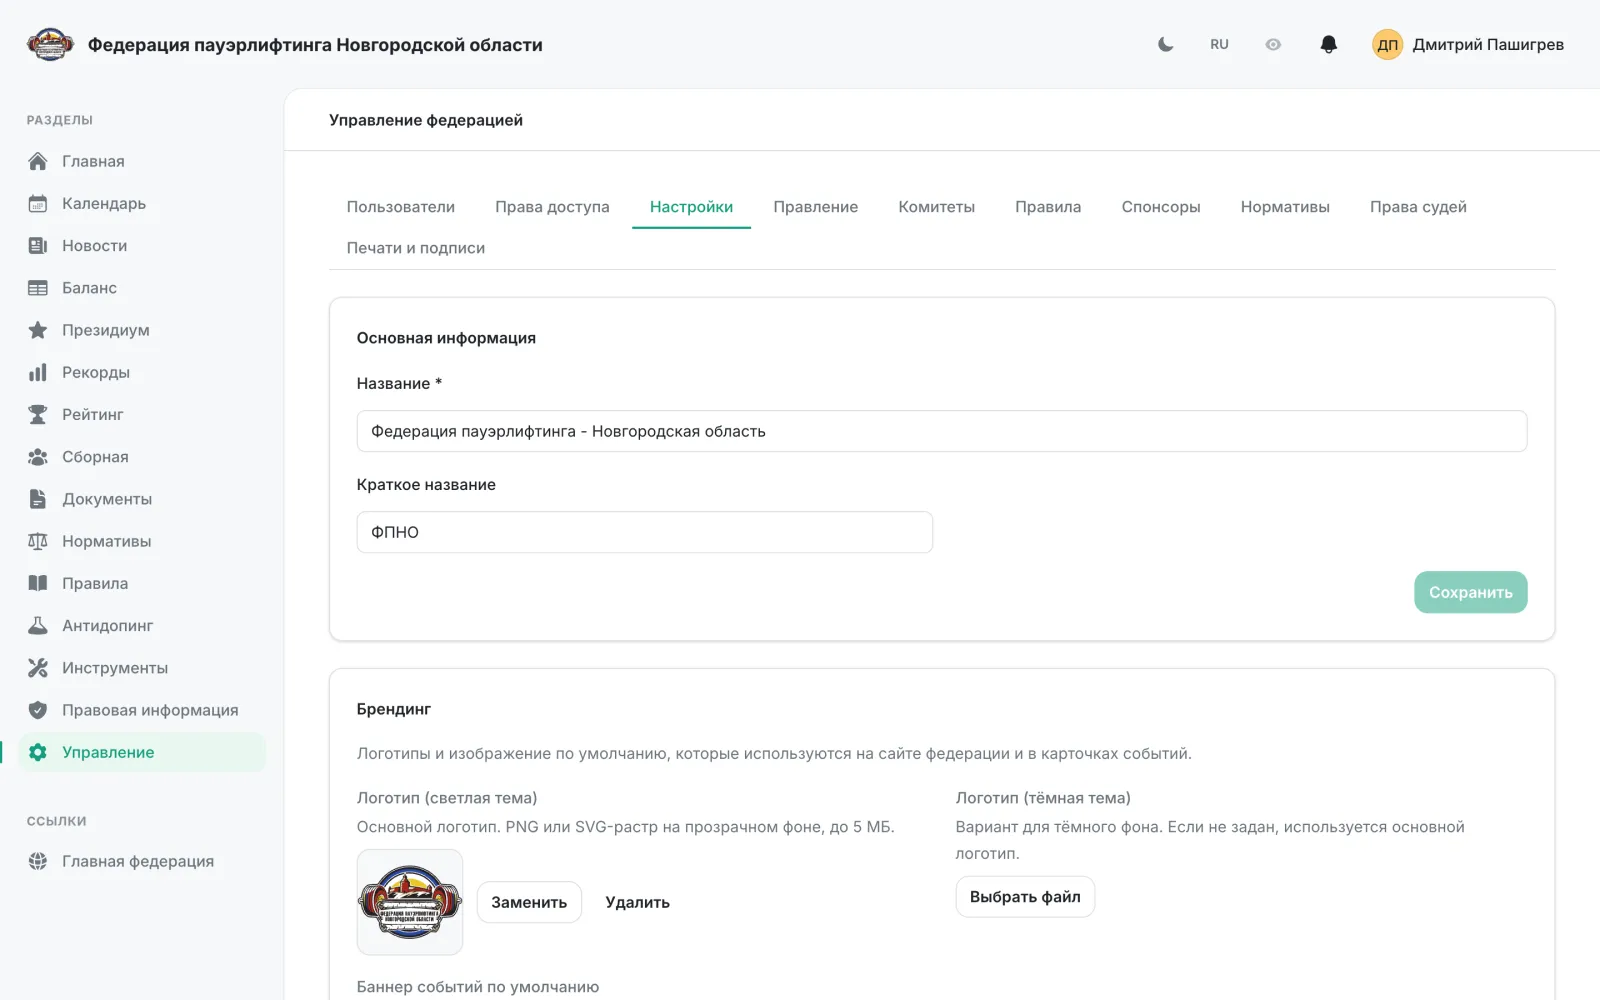
Администратор федерацииРаздел «Управление» — десять вкладок с настройками федерации.
- 1
«Пользователи» — создание пользователей, сброс пароля и блокировка.
- 2
«Права доступа» — матрица прав по каждому пользователю федерации.
- 3
«Настройки» — название, контакты, логотипы, баннер события и сроки заявок.
- 4
«Правление» — состав правления федерации.
- 5
«Комитеты» — тренерский совет, антидопинговая комиссия, дисциплинарный и судейский комитеты.
- 6
«Правила» — правила вида спорта.
- 7
«Спонсоры» — спонсоры и партнёры, отображаемые на сайте.
- 8
«Нормативы» — разрядные нормативы.
- 9
«Права судей» — набор прав, который можно выдавать судьям на события.
- 10
«Печати и подписи» — печать федерации и подпись президента для генерируемых документов.
Важно: Вкладки «Нормативы» и «Права судей» доступны, только если у федерации указан вид спорта. Сроки из вкладки «Настройки» задают, за сколько дней до старта открывается приём заявок и закрывается их редактирование.
Правила, нормативы и антидопинг
СпортсменКапитан командыОрганизаторАдминистратор федерацииСправочные разделы, открытые всем посетителям сайта.
- 1
«Правила» — полный текст правил вида спорта с поиском по разделам.
- 2
«Нормативы» — разрядные нормативы по дисциплинам.
- 3
«Антидопинг» — информация, состав комиссии и список дисквалифицированных.
- 4
«Калькулятор IPF» — очки IPF GL по сумме и собственному весу.